Background
Dynamic simulations are most useful when they are attached to some form of a graphical user interface (GUI). A few years ago, when working on Apps for the MacOS and iOS platforms, I used Cocoa and Cocoa touch to build interfaces with Xcode. The Mac designs follow the MVC (Model-View-Controller) pattern closely. I used to construct the views in Storyboards and control these views with ViewControllers. The modern way of creating interfaces for the Mac ecosystem is with SwiftUI, which I have not yet tried.
Going further back in time (couple of decades), when writing PC apps with Java, the built-in graphics system Swing was my choice for GUI’s. Swing was, and still is, part of the Java development package (SDK).
Since then, a more contemporary graphical system was developed called JavaFX. It was aimed at replacing Swing but this never happened the way it was intended. Today Swing is still part of the Java development package and JavaFX is a separate open-source package https://openjfx.io.
JavaFX
According to the JavaFX website “JavaFX is an open source, next generation client application platform for desktop, mobile and embedded systems built on Java.”
Why am I bringing up JavaFX when I’m currently not doing much Java programming? The reason is Kotlin and TornadoFX. As I mentioned in a previous blog post, Kotlin is a separate language that targets the JVM. TornadoFX is also a separate GUI language. However, it is written in Kotlin and uses JavaFX as the base for all its graphical constructs. In other words, Java and JavaFX go together the same way as Kotlin and TornadoFX go together. But TornadoFX is actually JavaFX wrapped in some Kotlin constructs. Confusing? Let me try to explain by way of a simple example inspired by the book
Learn JavaFX 17: Building User Experience and Interfaces with Java 2nd ed. Edition by Kishori Sharan and Peter Späth.
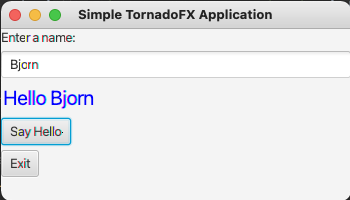
Here is the output of the simple JavaFX app. It has two labels, one textfield and two buttons. The user enters a name in the textfield and clicks the “Say Hello” button to get a greeting. When done you click the “Exit” button.
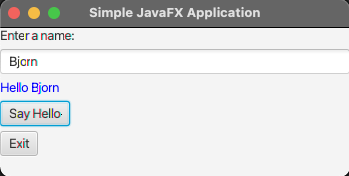
While being a very simple App it illustrates several important aspects of any GUI:
- How to invoke the App and make a window visible.
- How to enter text that can be consumed by the App.
- How to create buttons that respond when clicked.
- How to display output created by the App.
The code below shows how the App is constructed using Java and JavaFX.
import javafx.application.Application;
import javafx.application.Platform;
import javafx.scene.Scene;
import javafx.scene.control.Button;
import javafx.scene.control.Label;
import javafx.scene.control.TextField;
import javafx.scene.layout.VBox;
import javafx.stage.Stage;

public class SimpleFXApp extends Application {
    public static void main(String[] args) {
        Application.launch(args);
    }

    @Override
    public void start(Stage stage) {
        Label nameLabel = new Label("Enter a name:");
        TextField nameField = new TextField();

        Label msg = new Label();
        msg.setStyle("-fx-text-fill: blue;");

        // Create buttons
        Button sayHelloButton = new Button("Say Hello");
        Button exitButton = new Button("Exit");

        // Add the event handler for the Say Hello button
        sayHelloButton.setOnAction(e -> {
            String name = nameField.getText();
            if (name.trim().length() > 0) {
                msg.setText("Hello " + name);
            } else {
                msg.setText("Hello to you");
            }
        });

        // Add the event handler for the Exit button
        exitButton.setOnAction(e -> Platform.exit());

        // Create the root node
        VBox root = new VBox();

        // Set the vertical spacing to 5px
        root.setSpacing(5);

        // Add children nodes to the root node
        root.getChildren().addAll(nameLabel, nameField, msg, sayHelloButton, exitButton);

        Scene scene = new Scene(root, 350, 150);
        stage.setScene(scene);
        stage.setTitle("Simple JavaFX Application");
        stage.show();
    }
}
TornadoFX
Now let’s explore how we can write the same simple App using Kotlin and TornadoFX https://tornadofx.io.
Since TornadoFX lends itself nicely to MVC, I chose this file structure for the example. Thus, the first code snippet is just the View. It practically reads like prose in that labels, a textfield and two buttons are introduced by the builder functions. More on those later.
package view

import app.Styles
import controller.ViewController
import tornadofx.*
import kotlin.system.exitProcess

class MainView : View("Simple TornadoFX Application") {

    private val viewController: ViewController by inject()

    override val root = vbox {
        spacing = 5.0

        label("Enter a name:")
        textfield(viewController.name)
        label(viewController.labelText) {
            addClass(Styles.heading)
        }
        button("Say Hello") {
            action {
                viewController.makeGreeting()
            }
        }
        button("Exit") {
            action {
                exitProcess(0)
            }
        }
    }
}
Next we introduce the view controller code. It holds the values of the output (labelText) and the input textfield (name). It also contains the function that makes the greeting when the “Hello button” is clicked.
Notice that the MainView is derived from a View and that the ViewController is derived from a Controller. Both View and Controller are Singletons meaning that only one object of each class is constructed in the application. The view knows about the controller by “inject()”. The controller is instantiated the first time it is used in the view. The view is instantiated by the App as shown below.
package controller

import javafx.beans.property.SimpleStringProperty
import tornadofx.*

class ViewController: Controller() {

    val labelText = SimpleStringProperty()
    val name = SimpleStringProperty()

    fun makeGreeting() {
        val enteredName = name.value
        if (enteredName.trim().isNotEmpty()) {
            labelText.value = "Hello $enteredName"
        } else {
            labelText.value = "Hello to you"
        }
    }
}
We need two other pieces for the TornadoFX App to function properly. The first is the stage (window) for the application by settings its size and making it display. The MainView singleton is instantiated at the start of the App.
package app

import javafx.stage.Stage
import tornadofx.*
import view.MainView

class MyApp: App(MainView::class, Styles::class) {
    override fun start(stage: Stage) {
        with(stage) {
            width = 350.0
            height = 200.0
        }
        super.start(stage)
    }
}
The second piece is a Styles class that controls the font size and color.
package app
import javafx.scene.text.FontWeight
import tornadofx.*

class Styles : Stylesheet() {
    companion object {
        val heading by cssclass()
    }

    init {
        label and heading {
            padding = box(2.px)
            fontSize = 20.px
            fontWeight = FontWeight.BOLD
            textFill = c("blue")
        }
    }
}
By running the Kotlin/TornadoFX code we get the same output as in the Java example.This should not be surprising given that JavaFX is the engine that drives TornadoFX. What should be surprising (at least it was to me) is how the TornadoFX code can look so simple and not explicitly mention objects and classes of types TextField, Label, Button, etc.? I will try to explain below.
Kotlin Magic
TornadoFX manages to invoke all the same JavaFX code that Java uses but in a much more streamlined fashion. This is possible by use of Kotlin’s extension functions and trailing lambdas.
Let’s compare the implementation of the “Hello button” both in Java and Kotlin. In Java we have the following code snippet:
        Button sayHelloButton = new Button("Say Hello");

        sayHelloButton.setOnAction(e -> {
            String name = nameField.getText();
            if (name.trim().length() > 0) {
                msg.setText("Hello " + name);
            } else {
                msg.setText("Hello to you");
            }
        });
In TornadoFX we don’t mention the class Button. Instead we call a function with the name “button” (lowercase “b”):
        button("Say Hello") {
            action {
                viewController.makeGreeting()
            }
        }
fun makeGreeting() {
val enteredName = name.value
if (enteredName.trim().isNotEmpty()) {
labelText.value = "Hello $enteredName"
} else {
labelText.value = "Hello to you"
}
}The question is, how does the TornadoFX code generate the same code as JavaFX? The answer lies in the use of Kotlin extension functions and lambdas to construct builder functions. For example, look at the extension function “button” below taken from the TornadoFX’s controls library https://github.com/edvin/tornadofx/blob/master/src/main/java/tornadofx/Controls.kt#L309-L314. It takes three arguments, a String, a graphic node and a lambda function. The function is set equal to a JavaFX Button which in turn attaches the lambda function to itself.
In the example above, the lambda function is the function “action”, defined in the code below. It is also an extension function and it takes only one argument, a lambda function.
fun EventTarget.button(text: String = "", graphic: Node? = null, op: Button.() -> Unit = {}) = Button(text).attachTo(this, op) {
    if (graphic != null) it.graphic = graphic
}

fun ButtonBase.action(op: () -> Unit) = setOnAction { op() }
If you combine the result of the builder function, button(…), and its member function, action(…), you get the effect of a JavaFX Button handling an action event as illustrated below.
        button("Say Hello") {
            action {
                viewController.makeGreeting()
            }
        }

        ===

        Button("Say Hello").onAction = EventHandler { e: ActionEvent? -> viewController.makeGreeting() }
Discussion
TornadoFX offers a set of Kotlin constructs operating on JavaFX that makes it possible to build GUI’s simply and cleanly. I have not done any complex interfaces with TornadoFX yet but I plan on using it going forward.
