Categories
Distillation control Dynamic Modeling Kotlin Model-View-Controller TornadoFX User Interface

Column Simulation Revisited

Background

Earlier this year I posted the description, and implementation, of a distillation column simulation. The focus then was on object-oriented modeling in dynamic simulations. I collected the results of a 16 hour run in arrays which were later plotted using Let’s plot.

Since then I have come to appreciate TornadoFX as a UI tool. In my most recent post I showed how it is possible to build an interactive simulation app to plot the results of a fairly simple model, namely Burgers’ Equation. The simulation was batch in the sense that it only ran for a pre-specified amount of time. Thus, while interactive, this feature had somewhat limited use (e.g. “Pause”, “Resume”, and “Speed up” for example). The real benefit of interactive is for continuous time simulations. As I will show here, this can be done with TornadoFX as well.

The ideal candidate for continuous time simulation is a model of a continuously operating process. The distillation column is such a candidate. Now let me make another plug for MVC. Because I always separate the model from the UI, I could readily take the exact same distillation column model, that I had previously used with Let’s plot, and now use it with TornadoFX.

Results

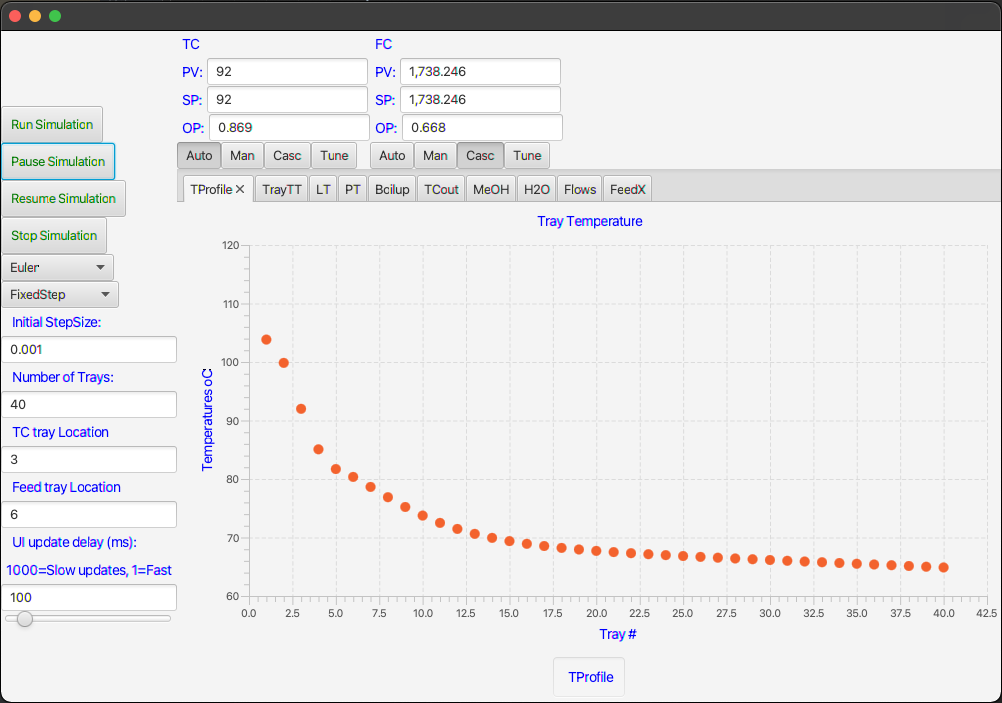
Since I had the model and the basic forms of the View and ViewController, I could build on those pieces to enhance the interface as shown below:

Interactive user interface for distillation column simulation.

As you can see I have kept most of the controls on the left panel but added several more plot-tabs in addition to two (PID)-controller faceplates. I attach a short video of how I use the interface.

Video showing the use of the column simulation interface.

Implementation

In the spirit of sharing and teaching I show most of the relevant code for making this interface. For example, the code below is the entire code for the main view. Notice that it describes only what you will see, not how the UI responds. The latter is the task for the ViewController.

The layout in this case is guided by three very useful items: “border pane”, “vbox”, and “hbox”. The border pane gives the overall structure of the interface, whereas the two boxes are used to position related items either vertically or horizontally. By alternating the use of these boxes you can get your buttons and fields to fall in whichever place you desire.

Both buttons and textfields have the option to use an “action” in which you call the appropriate function in the ViewController to respond to user requests.

package view

import controller.ViewController
import javafx.geometry.Pos
import javafx.scene.chart.NumberAxis
import javafx.scene.layout.Priority
import tornadofx.*

var viewController = find(ViewController::class)

class MainView: View() {
    override val root = borderpane {
        left = vbox {
            alignment = Pos.CENTER_LEFT
            button("Run Simulation") {
                action {
                    viewController.runSimulation()
                }
            }
            button("Pause Simulation") {
                action {
                    viewController.pauseSimulation()
                }
            }
            button("Resume Simulation") {
                action {
                    viewController.resumeSimulation()
                }
            }
            button("Stop Simulation") {
                action {
                    viewController.endSimulation()
                }
            }
            combobox(viewController.selectedDiscretizer, viewController.dicretizers)
            combobox(viewController.selectedStepController, viewController.stepControllers)
            label("  Initial StepSize:")
            textfield(viewController.initStepSize)
            label("  Number of Trays:")
            textfield(viewController.numberOfTrays)
            label("  TC tray Location")
            textfield(viewController.temperatureTrayLocation)
            label("  Feed tray Location")
            textfield(viewController.feedTrayLocation)
            label("  UI update delay (ms):")
            label("1000=Slow updates, 1=Fast")
            textfield(viewController.simulator.sliderValue)
            slider(min=1, max=1000, value = viewController.simulator.sliderValue.value) {
                bind(viewController.simulator.sliderValue)
            }
        }
        center = vbox {
            hbox {
                vbox {
                    label("TC")
                    hbox {
                        label("PV:")
                        textfield(viewController.tc.pv)
                    }
                    hbox {
                        label("SP:")
                        textfield(viewController.tc.sp) {
                            action {
                                viewController.tc.newSP()
                            }
                        }
                    }
                    hbox {
                        label("OP:")
                        textfield(viewController.tc.op) {
                            action {
                                viewController.tc.newOP()
                            }
                        }
                    }
                    hbox {
                        togglebutton("Auto", viewController.tc.toggleGroup) {
                            action { viewController.tc.modeChange() }
                        }
                        togglebutton("Man", viewController.tc.toggleGroup) {
                            action { viewController.tc.modeChange() }
                        }
                        togglebutton("Casc", viewController.tc.toggleGroup) {
                            action { viewController.tc.modeChange() }
                        }
                        togglebutton("Tune", viewController.tc.toggleGroup) {
                            action { viewController.tc.modeChange() }
                        }
                    }
                }
                vbox {
                    label("FC")
                    hbox {
                        label("PV:")
                        textfield(viewController.fc.pv)
                    }
                    hbox {
                        label("SP:")
                        textfield(viewController.fc.sp) {
                            action {
                                viewController.fc.newSP()
                            }
                        }
                    }
                    hbox {
                        label("OP:")
                        textfield(viewController.fc.op) {
                            action {
                                viewController.fc.newOP()
                            }
                        }
                    }
                    hbox {
                        togglebutton("Auto", viewController.fc.toggleGroup) {
                            action { viewController.fc.modeChange() }
                        }
                        togglebutton("Man", viewController.fc.toggleGroup) {
                            action { viewController.fc.modeChange() }
                        }
                        togglebutton("Casc", viewController.fc.toggleGroup) {
                            action { viewController.fc.modeChange() }
                        }
                        togglebutton("Tune", viewController.fc.toggleGroup) {
                            action { viewController.fc.modeChange() }
                        }
                    }
                }
            }
            tabpane {
                vgrow = Priority.ALWAYS
                tab("TProfile") {
                    scatterchart("Tray Temperature", NumberAxis(), NumberAxis()) {
                        //createSymbols = false
                        yAxis.isAutoRanging = false
                        val xa = xAxis as NumberAxis
                        xa.lowerBound = 1.0
                        xa.upperBound = 40.0
                        xa.tickUnit = 5.0
                        xa.label = "Tray #"
                        val ya = yAxis as NumberAxis
                        ya.lowerBound = 60.0
                        ya.upperBound = 120.0
                        ya.tickUnit = 10.0
                        ya.label = "Temperatures oC"
                        series("TProfile") {
                            data = viewController.tempProfile
                        }
                    }
                }
                tab("TrayTT") {
                    linechart("Tray Temperature", viewController.xAxisArray[0], NumberAxis()) {
                        createSymbols = false
                        yAxis.isAutoRanging = false
                        val ya = yAxis as NumberAxis
                        ya.lowerBound = 65.0
                        ya.upperBound = 120.0
                        ya.tickUnit = 5.0
                        ya.label = "Temperatures oC"
                        series("Temperature") {
                            data = viewController.tempList
                        }
                    }
                }
                tab("LT") {
                    linechart("Levels", viewController.xAxisArray[1], NumberAxis()) {
                        createSymbols = false
                        yAxis.isAutoRanging = false
                        val ya = yAxis as NumberAxis
                        ya.lowerBound = 40.0
                        ya.upperBound = 80.0
                        ya.tickUnit = 10.0
                        ya.label = "Level %"
                        series("Reboiler Level") {
                            data = viewController.reboilLevelList
                        }
                        series("Condenser Level") {
                            data = viewController.condenserLevelList
                        }
                    }
                }
                tab("PT") {
                    linechart("Column Pressure", viewController.xAxisArray[2], NumberAxis()) {
                        createSymbols = false
                        yAxis.isAutoRanging = false
                        val ya = yAxis as NumberAxis
                        ya.lowerBound = 0.75
                        ya.upperBound = 1.25
                        ya.tickUnit = 0.05
                        ya.label = "Pressure, atm"
                        series("Pressure") {
                            data = viewController.pressureList
                        }
                    }
                }
                tab("Boilup") {
                    linechart("Reboiler Boilup", viewController.xAxisArray[3], NumberAxis()) {
                        createSymbols = false
                        yAxis.isAutoRanging = false
                        val ya = yAxis as NumberAxis
                        ya.lowerBound = 1500.0
                        ya.upperBound = 2000.0
                        ya.tickUnit = 100.0
                        ya.label = "Flow, kmol/h"
                        series("Temperature") {
                            data = viewController.boilupList
                        }
                    }
                }
                tab("TCout") {
                    linechart("TC output signal", viewController.xAxisArray[4], NumberAxis()) {
                        createSymbols = false
                        yAxis.isAutoRanging = false
                        val ya = yAxis as NumberAxis
                        ya.lowerBound = 60.0
                        ya.upperBound = 100.0
                        ya.tickUnit = 10.0
                        ya.label = "Signal value %"
                        series("TCout") {
                            data = viewController.tcOutList
                        }
                    }
                }
                tab("MeOH") {
                    linechart("Methanol in Reboiler", viewController.xAxisArray[5], NumberAxis()) {
                        createSymbols = false
                        yAxis.isAutoRanging = false
                        val ya = yAxis as NumberAxis
                        ya.lowerBound = 0.0
                        ya.upperBound = 10000.0
                        ya.tickUnit = 2000.0
                        ya.label = "ppm"
                        series("MeOH") {
                            data = viewController.meohBtmsList
                        }
                    }
                }
                tab("H2O") {
                    linechart("Water in condenser", viewController.xAxisArray[6], NumberAxis()) {
                        createSymbols = false
                        yAxis.isAutoRanging = false
                        val ya = yAxis as NumberAxis
                        ya.lowerBound = 0.0
                        ya.upperBound = 400.0
                        ya.tickUnit = 50.0
                        ya.label = "ppm"
                        series("H2O") {
                            data = viewController.h20OHList
                        }
                    }
                }
                tab("Flows") {
                    linechart("Feed, Btms and Dist flow", viewController.xAxisArray[7], NumberAxis()) {
                        createSymbols = false
                        yAxis.isAutoRanging = false
                        val ya = yAxis as NumberAxis
                        ya.lowerBound = 0.0
                        ya.upperBound = 2000.0
                        ya.tickUnit = 200.0
                        ya.label = "kmol/h"
                        series("Feed") {
                            data = viewController.feedRateList
                        }
                        series("Btms") {
                            data = viewController.btmsFlowList
                        }
                        series("Dist") {
                            data = viewController.distList
                        }

                    }
                }
                tab("FeedX") {
                    linechart("MeOH in Feed", viewController.xAxisArray[8], NumberAxis()) {
                        createSymbols = false
                        yAxis.isAutoRanging = false
                        val ya = yAxis as NumberAxis
                        ya.lowerBound = 30.0
                        ya.upperBound = 60.0
                        ya.tickUnit = 5.0
                        ya.label = "Composition, mole-%"
                        series("FeedX") {
                            data = viewController.feedCmpList
                        }
                    }
                }

            }
        }
    }
}

I’m not showing the ViewController code here as it is quite similar to what I had previously shown in my most recent post. However, there is a piece of new code that is quite important and sits between the model and the interface. This is a class to handle the display and actions of the PID-controller faceplates. This code is shown here.

package controller

import instruments.ControlMode
import instruments.PIDController
import javafx.beans.property.SimpleDoubleProperty
import javafx.scene.control.ToggleButton
import javafx.scene.control.ToggleGroup

class PIDViewController(var pid: PIDController) {
    val pv = SimpleDoubleProperty(pid.pv)
    val sp = SimpleDoubleProperty(pid.sp)
    val op = SimpleDoubleProperty(pid.output)
    var mode = "Auto"

    val toggleGroup = ToggleGroup()
    fun update() {
        pv.value = pid.pv
        if (mode != "Man") {
            op.value = pid.output
        }
        if (mode == "Casc" || mode == "Man") {
            sp.value = pid.sp
        }
    }
    fun modeChange() {
        val button = toggleGroup.selectedToggle as? ToggleButton
        val buttonText = button?.text ?: "Null"
        when (buttonText) {
            "Auto" -> {
                pid.controllerMode = ControlMode.automatic
                mode = "Auto"
            }
            "Man" -> {
                pid.controllerMode = ControlMode.manual
                mode = "Man"
            }
            "Casc" -> {
                pid.controllerMode = ControlMode.cascade
                mode = "Casc"
            }
            "Tune" -> {
                pid.controllerMode = ControlMode.autoTune
                mode = "Tune"
            }
            else -> {}
        }
    }
    fun newSP() {
        pid.sp = sp.value
    }
    fun newOP() {
        pid.output = op.value
    }
}

This class is akin to a view controller in that has properties that can be displayed in the main interface. However, it also owns a reference to an actual PID controller in the process model. That way we can interactively interpret user input and convey them to the model.

Conclusions

Interactive dynamic simulations are extremely useful tools in the exploration, understanding and control of real processes. Over the years I have built many models with different interfaces for different platforms. I find Kotlin and TornadoFX to be a very powerful combination for desktop applications compiled for the JVM.

Categories
Dynamic Modeling Kotlin Model-View-Controller TornadoFX User Interface

Building an Interactive Process Simulator from Scratch

Introduction

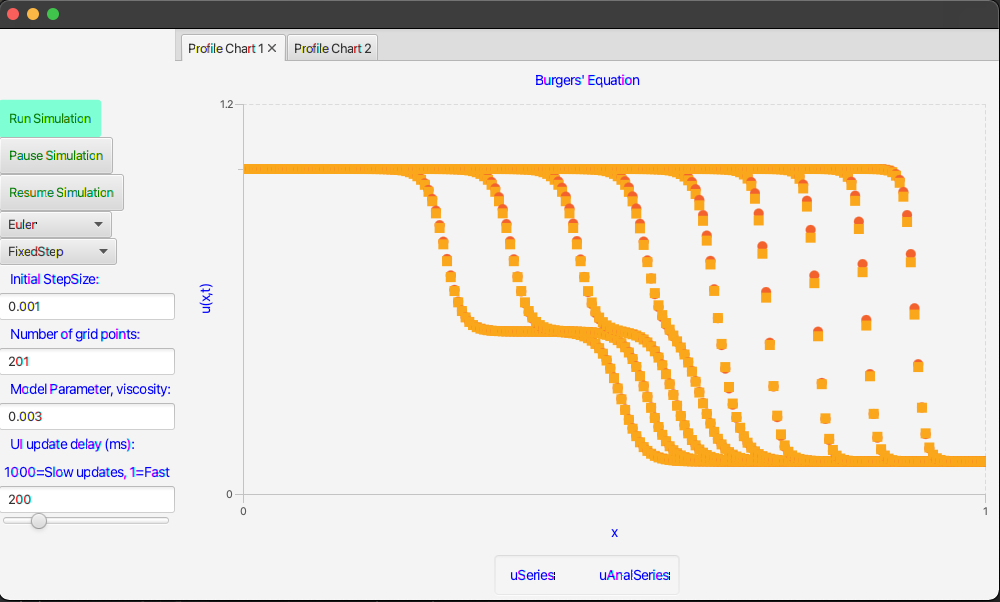
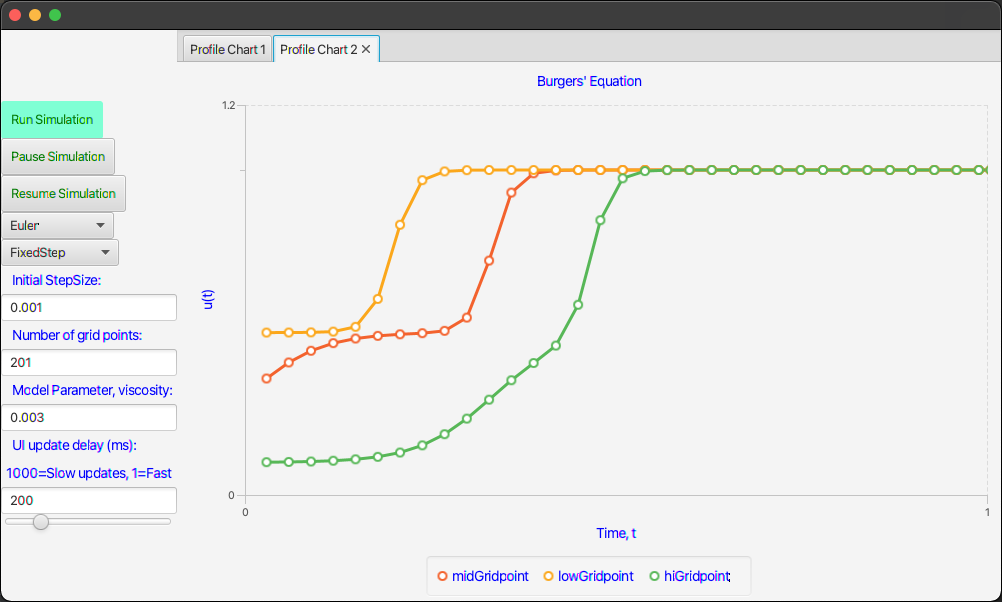
In previous posts I have introduced dynamic integration techniques, MVC designs, Kotlin and TornadoFX. It is now time to put all the pieces together in a free-standing app with a responsive user interface. The final result will look like these two screen shots.

Figure 1. User interface with time dependent velocity profiles shown.
Figure 2. Tab 2 of the UI showing the fluid velocity as a function of time at three different x-positions.

Let’s get started putting this app together piece by piece.

Create the Project Template

In previous posts I have shown how to do this so I will move quickly through this section.

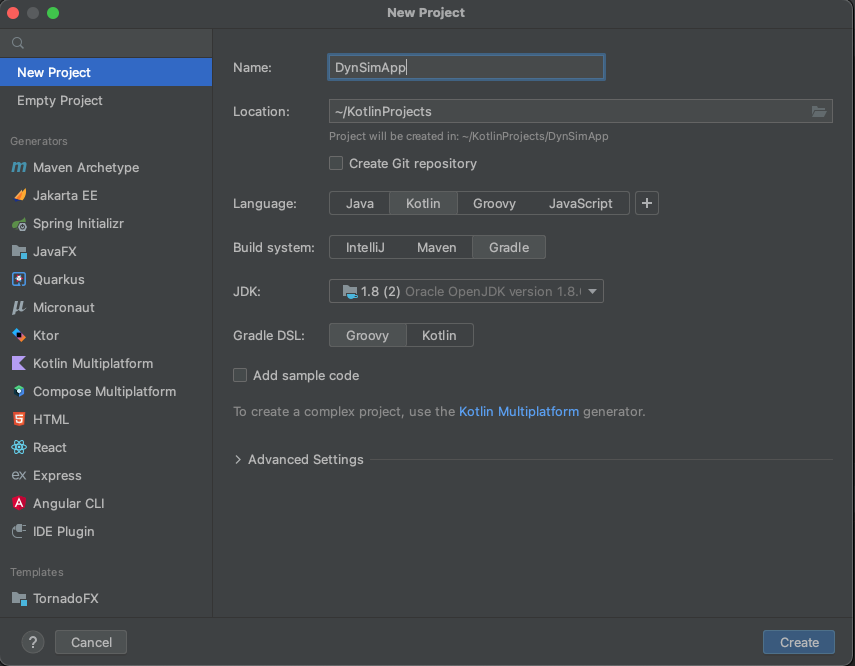
Step 1. Make a new project with JetBrains IntelliJ.

Figure 3. The new project screen. Use Kotlin, Gradle, Groovy and JDK 1.8

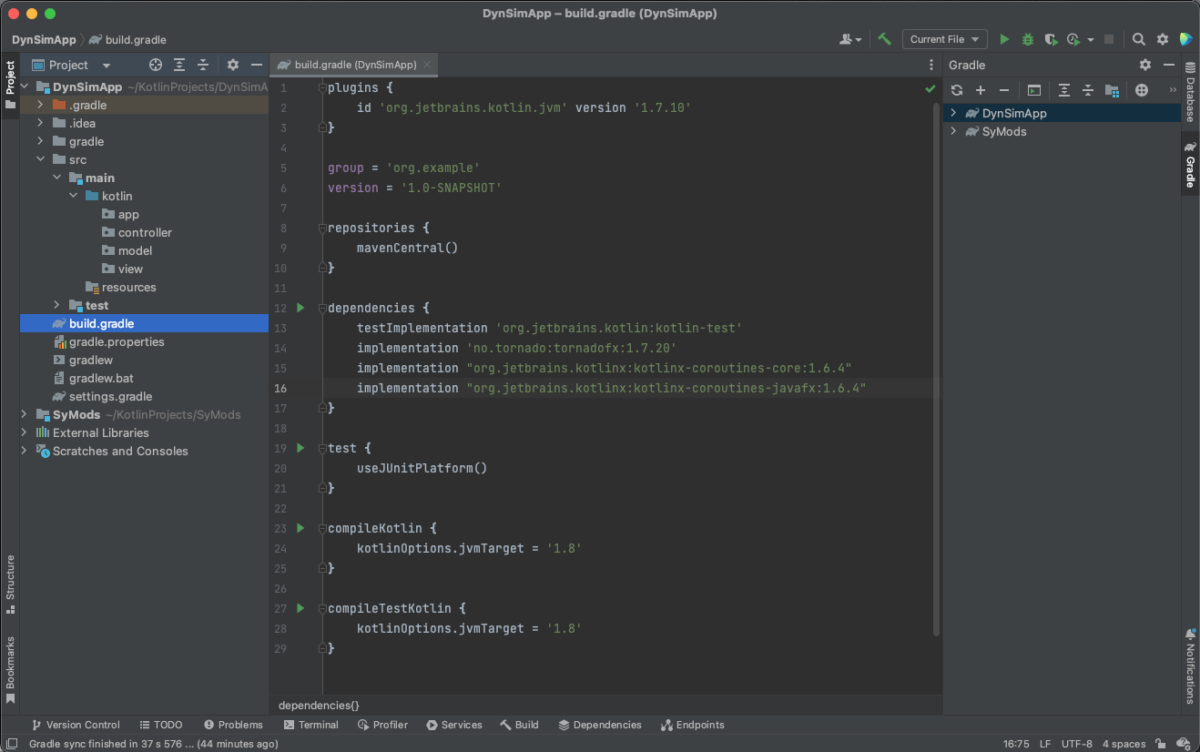
Step 2. Link the project to any local, supporting projects you might have (in my case SyMods), assign dependencies in build.gradle and finally provide empty folders (packages) for the “app”, “model”, “view” and the “controller” as in MVC.

Figure 4. Model structure ready for source files.

Since the build.gradle is such an important part of the project I show the script more clearly here:

plugins {
    id 'org.jetbrains.kotlin.jvm' version '1.7.10'
}

group = 'org.example'
version = '1.0-SNAPSHOT'

repositories {
    mavenCentral()
}

dependencies {
    testImplementation 'org.jetbrains.kotlin:kotlin-test'
    implementation 'org.example:SyMods'
    implementation 'no.tornado:tornadofx:1.7.20'
    implementation "org.jetbrains.kotlinx:kotlinx-coroutines-core:1.6.4"
    implementation "org.jetbrains.kotlinx:kotlinx-coroutines-javafx:1.6.4"
}

test {
    useJUnitPlatform()
}

compileKotlin {
    kotlinOptions.jvmTarget = '1.8'
}

compileTestKotlin {
    kotlinOptions.jvmTarget = '1.8'
}

The Model

In most versions of MVC designs, the model is the only part that is completely independent of the other pieces. In other words, the model has no knowledge of either the view or the (view-) controller. The only contract the model has with the outside world is that it implements the Integratable interface. That way the same model, without substantial modifications, can be used with a completely different user interface implementation (e.g. Java/Swing or Swift/Cocoa).

The model I have chosen for this example is borrowed from the field of fluid dynamics. Such systems are described by a set of nonlinear partial differential equations expressing the conservation of mass and momentum for incompressible Newtonian fluids. The fluid velocity in three dimensions is captured in the Navier Stokes equation of fluid dynamics (see Ref. 1 for a complete derivation).

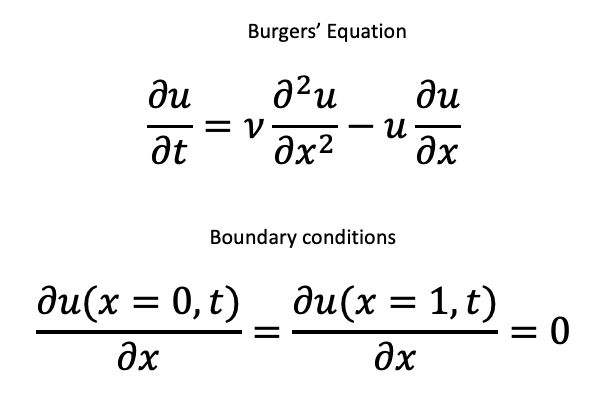
If we limit the flow model to the fluid velocity component in one dimension, and neglect pressure and gravitational effects, we obtain the one-dimensional Burgers’ equation.

Figure 5. Model of the one-dimensional velocity component, u, for a viscous fluid.

We can think of this equation as representing the velocity in the x-direction as the fluid is moving freely along a path. Note that the fluid is viscous as captured by the kinematic viscosity, v (m^2/s).

According to Ref. 1, Burgers’ equation is a standard test problem for numerical methods for two reasons (1) It is a nonlinear equation with known analytical solutions, (2) It can be made increasingly more difficult to solve numerically as the viscosity decreases.

The equation is first order in time and second order in space. Thus, it requires one initial condition and two boundary conditions. The initial condition is taken from the analytical solution at time = 0. The boundary conditions are shown above. They state that the spatial velocity derivative is zero at both ends of the flow path at all times.

Numerical techniques for solving partial differential equations like this typically involve breaking up the x-direction in a large number (N-1) of small segments, dx, flanked by N grid points to help with the approximation of the spatial derivatives. This way we end up with a set of N ordinary differential equations that can be solved with standard integrators such as Euler or Runge-Kutta.

For this example I’m choosing to use a Spline Collocation Method to approximate the first and second order spatial derivatives (See Ref. 2 for details of this method). The complete code for the model is shown here:

package model

import integrators.Integratable
import utilities.derivativesAtGridpoints
import kotlin.math.exp

class BurgersEquation(var nGridPoints: Int): Integratable {

    val length = 1.0
    var dx = length / (nGridPoints - 1)
    var time = 0.0
    var vis = 0.003
    var x = DoubleArray(nGridPoints) { it * dx }
    var u = DoubleArray(nGridPoints) { phi(x[it], time) }

    override fun initialConditionsUsingArray(xin: DoubleArray): DoubleArray {
        x = DoubleArray(nGridPoints) { it * dx }
        val u0 = xin.copyOf()
        for (i in 0 until nGridPoints) {
            u0[i] = phi(this.x[i], time)
        }
        return u0
    }

    override fun updateStatesFromStateVector(x: DoubleArray, time: Double) {
        this.time = time
        u = x
    }

    override fun updateDerivativeVector(df: DoubleArray, time: Double): DoubleArray {
        val ux = derivativesAtGridpoints(xL=0.0, xU=length, n=nGridPoints, u=u).b
        ux[0] = 0.0
        ux[nGridPoints-1] = 0.0
        val uxx = derivativesAtGridpoints(xL=0.0, xU=length, n=nGridPoints, u=ux).b
        val ut = df.copyOf()
        for (i in 0 until nGridPoints) {
            ut[i] = vis * uxx[i] - u[i] * ux[i]
        }
        return ut
    }

    override fun dimension(): Int {
        return nGridPoints
    }

    override fun stiff(): Boolean {
        return false
    }

    fun phi(x: Double, t: Double): Double {
        //
        // Function phi computes the exact solution of Burgers' equation
        // for comparison with the numerical solution.  It is also used to
        // define the initial and boundary conditions for the numerical
        // solution.
        //
        // Analytical solution
        val a = (0.05 / vis) * (x - 0.5 + 4.95 * t)
        val b = (0.25 / vis) * (x - 0.5 + 0.75 * t)
        val c = (0.5 / vis) * (x - 0.375)
        val ea = exp(-a)
        val eb = exp(-b)
        val ec = exp(-c)
        return (0.1 * ea + 0.5 * eb + ec) / (ea + eb + ec)
    }
}

The View

Next to the model, the view is similarly isolated from the other software components. In particular, it has no direct knowledge of the model implementation. This is important from a code reuse point of view. For example, it would be quite easy to use this view for another model by just changing a few text labels.

I’m using TornadoFX to build the interface. Without further explanations of the code, I think you can see how the declarative statements below result in the interfaces shown in Figures 1 and 2.

package view

import controller.ViewController
import javafx.geometry.Pos
import javafx.scene.chart.NumberAxis
import tornadofx.*

var viewController = find(ViewController::class)

class MainView: View() {
    override val root = borderpane {
        left = vbox {
            alignment = Pos.CENTER_LEFT
            button("Run Simulation") {
                action {
                    viewController.runSimulation()
                }
            }
            button("Pause Simulation") {
                action {
                    viewController.pauseSimulation()
                }
            }
            button("Resume Simulation") {
                action {
                    viewController.resumeSimulation()
                }
            }
            combobox(viewController.selectedDiscretizer, viewController.dicretizers)
            combobox(viewController.selectedStepController, viewController.stepControllers)
            label("  Initial StepSize:")
            textfield(viewController.initStepSize)
            label("  Number of grid points:")
            textfield(viewController.nGridPoints)
            label("  Model Parameter, viscosity:")
            textfield(viewController.viscosity)
            label("  UI update delay (ms):")
            label("1000=Slow updates, 1=Fast")
            textfield(viewController.simulator.sliderValue)
            slider(min=1, max=1000, value = viewController.simulator.sliderValue.value) {
                bind(viewController.simulator.sliderValue)
            }
        }
        center = tabpane {
            tab("Profile Chart 1") {
                scatterchart("Burgers' Equation", NumberAxis(), NumberAxis()) {
                    xAxis.isAutoRanging = false
                    val xa = xAxis as NumberAxis
                    xa.lowerBound = 0.0
                    xa.upperBound = 1.0
                    xa.label = "x"
                    yAxis.isAutoRanging = false
                    val ya = yAxis as NumberAxis
                    ya.lowerBound = 0.0
                    ya.upperBound = 1.2
                    ya.label = "u(x,t)"
                    series("uSeries") {
                        data = viewController.uSeriesData
                    }
                    series("uAnalSeries") {
                        data = viewController.uAnalSeriesData
                    }
                }
            }
            tab("Profile Chart 2") {
                linechart("Burgers' Equation", NumberAxis(), NumberAxis()) {
                    xAxis.isAutoRanging = false
                    val xa = xAxis as NumberAxis
                    xa.lowerBound = 0.0
                    xa.upperBound = 1.0
                    xa.label = "Time, t"
                    yAxis.isAutoRanging = false
                    val ya = yAxis as NumberAxis
                    ya.lowerBound = 0.0
                    ya.upperBound = 1.2
                    ya.label = "u(t)"
                    series("midGridpoint") {
                        data = viewController.midGridpointData
                    }
                    series("lowGridpoint") {
                        data = viewController.lowGridpointData
                    }
                    series("hiGridpoint") {
                        data = viewController.hiGridpointData
                    }
                }
            }
        }
    }
}

A couple of important comments on the view code:

  • There is no explicit mention of any of the UI classes like Button, Label, TextField etc.. Instead, these are created implicitly from TornadoFX’s builder functions.
  • There is no procedural code in the view, only configuration statements.
  • Values in and out of the interface go through the viewController. The controller is injected into the view by the statement var viewController = find(ViewController::class)
  • The view component values and the viewController variables are connected through bindings. Bindings allow for automatic transfer of updated information without having to write code to detect changes and transfer new values from one object to another.

Anyone who has worked with Java/Swing or Java/JavaFX will appreciate how simple it is to build an interface with Kotlin/TornadoFX.

View – Styling

While it is possible to provide styling code directly into the view functions I find that view code becomes less clear. An alternative that I like is to list the styling attributes in a separate Stylesheet class. This is what I used for the example application:

package app

import javafx.scene.paint.Color
import javafx.scene.text.FontWeight
import tornadofx.*

class Styles : Stylesheet() {
    init {
        button {
            padding = box(10.px)
            textFill = c("green")
            and(hover) {
                backgroundColor += Color.AQUAMARINE
            }
        }

        label {
            padding = box(5.px)
            fontSize = 14.px
            fontWeight = FontWeight.BOLD
            textFill = c("blue")
        }
    }
}

I have only done the most basic of what you can achieve with these Stylesheets. For example, I specify how much padding the buttons should have and their text color. I also specify the desired color change when the mouse “hovers” over them. Similar decorations for the labels are also shown.

The Controller

The controller usually takes a very central position in most MVC designs. In my version it owns the model and it is injected into the view as I mentioned above. The controller is also an Observer of the Simulator (see below). As such it implements the IObserver‘s update(…) function. This function is called from the Simulator when changes in the model’s data have taken place and need to be displayed. Recall that the model does not know about the view and therefore has no direct way of communicating with it. All communication between the model and the view must pass through the controller.

The controller implements a few JavaFX and TornadoFX data structures that are observable to view items through bindings. For example, take the uSeriesData in the controller. It holds data for one of the series in the view’s Profile Chart 1. This is how we use it in the view:

series("uSeries") {
      data = viewController.uSeriesData
}

In the controller this variable is a special ArrayList and is declared as follows:

var uSeriesData = FXCollections.observableArrayList<XYChart.Data<Number, Number>>()

When the Simulator sends the controller an update(…) request, the uSeriesData array is updated based on information it finds in the model.

if (updateCounter > updateFrequency || updateCounter == 0) {
      for (i in 0 until model.nGridPoints) {
           val xValue = model.x[i]
           uSeriesData.add(XYChart.Data(xValue, model.u[i]))
       }
       updateCounter = 1
 }

The neat feature about these data structures is that they are “observable” in the sense that the chart updates automatically as soon as the controller makes new data available in the uSeriesData array. Similarly, when data items are removed from the array, the display changes accordingly. In other words, there is no need to explicitly “refresh” the charts with user code. Ref 3. is a good source to learn about these data structures and their use in JavaFX/TornadoFX applications.

package controller

import utilities.IObserver
import javafx.beans.property.SimpleDoubleProperty
import javafx.beans.property.SimpleIntegerProperty
import javafx.beans.property.SimpleStringProperty
import javafx.collections.FXCollections
import javafx.scene.chart.XYChart
import model.BurgersEquation
import model.Simulator
import tornadofx.*


class ViewController: Controller(), IObserver {

    var model = BurgersEquation(201)
    var endTime = 1.0
    var simulator = Simulator(model)

    var uSeriesData = FXCollections.observableArrayList<XYChart.Data<Number, Number>>()
    var uAnalSeriesData = FXCollections.observableArrayList<XYChart.Data<Number, Number>>()
    var midGridpointData = FXCollections.observableArrayList<XYChart.Data<Number, Number>>()
    var lowGridpointData = FXCollections.observableArrayList<XYChart.Data<Number, Number>>()
    var hiGridpointData = FXCollections.observableArrayList<XYChart.Data<Number, Number>>()


    val dicretizers = FXCollections.observableArrayList("Euler", "RungeKutta", "RKFehlberg")
    val stepControllers = FXCollections.observableArrayList("FixedStep", "VariableStep")
    val selectedDiscretizer = SimpleStringProperty("Euler")
    val selectedStepController = SimpleStringProperty("FixedStep")
    val initStepSize = SimpleDoubleProperty(0.001)
    val nGridPoints = SimpleIntegerProperty(model.nGridPoints)
    val viscosity = SimpleDoubleProperty(model.vis)

    var updateCounter = 0
    val updateFrequency = 4

    init {
        simulator.addIObserver(this)
    }

    fun runSimulation() {
        model = BurgersEquation(nGridPoints.value)
        model.vis = viscosity.value
        simulator.ode = model
        simulator.discretizer = selectedDiscretizer.value
        simulator.stepSizeType = selectedStepController.value
        simulator.initialStepSize = initStepSize.value
        simulator.runSimulation()
    }

    fun pauseSimulation() {
        simulator.pauseSimulation()
    }

    fun resumeSimulation() {
        simulator.resumeSimulation()
    }

    override fun update(theObserved: Any?, changeCode: Any?) {
        val code = changeCode as String
        when (code) {
            "reset" -> {
                if (uSeriesData.size > 1) {
                    uSeriesData.remove(0, uSeriesData.size)
                    uAnalSeriesData.remove(0, uAnalSeriesData.size)
                    midGridpointData.remove(0, midGridpointData.size)
                    lowGridpointData.remove(0, lowGridpointData.size)
                    hiGridpointData.remove(0, hiGridpointData.size)
                }
            }
            else -> {
                val time = model.time
                if (updateCounter > updateFrequency || updateCounter == 0) {
                    for (i in 0 until model.nGridPoints) {
                        val xValue = model.x[i]
                        uSeriesData.add(XYChart.Data(xValue, model.u[i]))
                        uAnalSeriesData.add(XYChart.Data(xValue, model.phi(x = xValue, t = time)))
                    }
                    updateCounter = 1
                }
                updateCounter += 1
                val midGridpoint = model.nGridPoints / 2
                val lowGridpoint = midGridpoint - 20 * model.nGridPoints / 201
                val hiGridpoint = midGridpoint + 20 * model.nGridPoints / 201
                midGridpointData.add(XYChart.Data(time, model.u[midGridpoint]))
                lowGridpointData.add(XYChart.Data(time, model.u[lowGridpoint]))
                hiGridpointData.add(XYChart.Data(time, model.u[hiGridpoint]))
            }
        }
    }
}

There are a few more modules we have to discuss before the app is complete. One of these is the Simulator.

The Simulator

This module is most closely characterized as a model but it is generic enough that it can be treated separately. The simulator is responsible for the numerical integration and for notifying the controller when is time to sample the model for new data to display.

The simulator is generic in the sense that it can integrate any model as long as the model implements the Integratable interface. The simulator itself implements the interface IObservable which means that it can keep track of, and notify, observing objects (e.g. the controller).

An important task for the simulator is to start the integration and run it to completion without blocking the user from working with the UI. Traditionally this is done by starting a low priority background Thread. However, threads can be tricky to work with, especially around shared data. Instead I have opted to use Kotlin’s Coroutine package. Ref. 4 is the perfect source to learn about coroutines. Here I will only highlight the features I have used.

Coroutines are launched in a CoroutineScope. For UI applications it is quite useful to derive a private scope from the general CoroutineScope() but specify that we want the coroutine to be dispatched on the JavaFx UI thread.

import kotlinx.coroutines.*
import kotlinx.coroutines.javafx.JavaFx


class Simulator(var ode: Integratable) : IObservable {

    private var job = Job()
    private val myScope: CoroutineScope =     CoroutineScope(Dispatchers.JavaFx + job)
                :
                :
                :
}

We use the private scope to launch a coroutine with code provided in the trailing lambda.

        myScope.launch {
            while (time <= endTime) {
                time = integrator.currentTime
                integrator.startTime = time
                integrator.endTime = time + dt
                integrator.continueCalculations()
                            :
                            :
                            :
            }
        }

You can easily identify these code snippets in their complete context of the Simulator code below. The coroutines are quite nice for dynamic simulations like this because we can implement start, stop, pause, resume, etc. without freezing the UI or making it sluggish.

package model

import integrators.DiscretizationModel
import integrators.Integratable
import integrators.IntegrationServer
import integrators.StepSizeControlModel
import javafx.beans.property.SimpleDoubleProperty
import utilities.IObservable
import utilities.IObserver
import utilities.ObservableComponent
import kotlinx.coroutines.*
import kotlinx.coroutines.javafx.JavaFx


class Simulator(var ode: Integratable) : IObservable {
    private val myObservableComponent: ObservableComponent = ObservableComponent()
    private var job = Job()
    private val myScope: CoroutineScope = CoroutineScope(Dispatchers.JavaFx + job)

    val sliderValue = SimpleDoubleProperty(200.0)
    var sliderValueInt: Long = 200

    lateinit var integrator: IntegrationServer
    var discretizer = "Euler"
    var stepSizeType = "FixedStep"
    lateinit var discretizationType: DiscretizationModel
    lateinit var stepSizeControlType: StepSizeControlModel
    var time = 0.0
    var endTime = 1.0
    var reportingInterval = 0.1
    var dt = reportingInterval / 10
    var dt0 = dt
    var initialStepSize = 0.001
    var simulationPaused = false
    var endSimulation = false
    private var reportTimer = 0.0
    var x: DoubleArray

    init {
        val dim = ode.dimension()
        x = DoubleArray(dim)
        System.arraycopy(ode.initialConditionsUsingArray(x), 0, x, 0, dim)
    }

    fun reset() {
        discretizationType = when(discretizer) {
            "RungeKutta" -> DiscretizationModel.ClassicalRK
            "RKFehlberg" -> DiscretizationModel.RKFehlberg
            else -> DiscretizationModel.ModifiedEuler
        }
        stepSizeControlType = when(stepSizeType) {
            "VariableStep" -> StepSizeControlModel.VariableStepController
            else -> StepSizeControlModel.FixedStepController
        }
        x = DoubleArray(ode.dimension())
        System.arraycopy(ode.initialConditionsUsingArray(x), 0, x, 0, ode.dimension())
        integrator = IntegrationServer(discretizationType, stepSizeControlType);
        integrator.ode = ode

        integrator.initialStepSize = initialStepSize
        integrator.accuracy = 1.0e-5
        reportingInterval = 0.03
        dt = reportingInterval / 2
        dt0 = dt

        time = 0.0
        reportTimer = 0.0
        integrator.startTime = 0.0
        integrator.start(x)
    }

    fun pauseSimulation() {
        simulationPaused = true
    }

    fun resumeSimulation() {
        simulationPaused = false
    }

    fun endSimulation() {
        endSimulation = true
    }


    fun runSimulation() {
        reset()
        endSimulation = false
        simulationPaused = false
        myScope.launch {
            myObservableComponent.notifyIObservers(this, "reset")
            while (time <= endTime) {
                time = integrator.currentTime
                integrator.startTime = time
                integrator.endTime = time + dt
                integrator.continueCalculations()
                time = integrator.currentTime
                x = integrator.currentValues()

                reportTimer += dt
                dt = if (simulationPaused) {
                    delay(500L)
                    0.0
                } else {
                    dt0
                }
                if (reportTimer >= reportingInterval) {
                    sliderValueInt = sliderValue.value.toLong()
                    delay(sliderValueInt)
                    myObservableComponent.notifyIObservers(this, "update")
                    reportTimer = 0.0
                }
                if (time >= endTime || endSimulation) {
                    myObservableComponent.notifyIObservers(this, "done")
                }
            }
        }
    }

    override fun addIObserver(anIObserver: IObserver?) {
        myObservableComponent.addIObserver(anIObserver)
    }

    override fun deleteIObserver(anIObserver: IObserver?) {
        myObservableComponent.deleteIObserver(anIObserver)
    }

    override fun deleteIObservers() {
        myObservableComponent.deleteIObservers()
    }
}

The App

We now have all the pieces ready for the App itself. It is trivially simple as you can see from the code below:

package app

import javafx.stage.Stage
import tornadofx.*
import view.MainView

class MyApp: App(MainView::class, Styles::class) {
    override fun start(stage: Stage) {
        with(stage) {
            width = 1000.0
            height = 600.0
        }
        super.start(stage)
    }
}

Let’s review what happens here.

  1. The Application is instantiated along with the View and Styles classes.
  2. We set the size of the stage (=application window) and start the UI Thread.
  3. The View instantiates the ViewController, which in turn instantiates a copy of the Model and the Simulator.

At that point all the actors are on stage, so to speak, and the application is ready for user input. In the short video below I show how the app is used.

Conclusions

Kotlin is a perfect tool for dynamic simulations because it multi-platform (by virtue of running on the JVM) and fast. TornadoFX, a domain specific language written in Kotlin for use with JavaFX, is also quite attractive in constructing a user interface quickly and with minimal code.

References

  1. W. E. Schiesser, Computational Mathematics in Engineering and Applied Science, CRC Press, 1994.
  2. W. E. Schiesser, Spline Collocation Methods for Partial Differential Equations, John Wiley & Sons, 2017.
  3. K. Sharan and P. Späth, Learn JavaFX 17 2nd ed., Apress Media LLC, 2022.
  4. M. Moskala, Kotlin Coroutines, Kt. Academy, 2022
Categories
Kotlin Model-View-Controller TornadoFX User Interface

Introduction to TornadoFX

Background

Dynamic simulations are most useful when they are attached to some form of a graphical user interface (GUI). A few years ago, when working on Apps for the MacOS and iOS platforms, I used Cocoa and Cocoa touch to build interfaces with Xcode. The Mac designs follow the MVC (Model-View-Controller) pattern closely. I used to construct the views in Storyboards and control these views with ViewControllers. The modern way of creating interfaces for the Mac ecosystem is with SwiftUI, which I have not yet tried.

Going further back in time (couple of decades), when writing PC apps with Java, the built-in graphics system Swing was my choice for GUI’s. Swing was, and still is, part of the Java development package (SDK).

Since then, a more contemporary graphical system was developed called JavaFX. It was aimed at replacing Swing but this never happened the way it was intended. Today Swing is still part of the Java development package and JavaFX is a separate open-source package https://openjfx.io.

JavaFX

According to the JavaFX website “JavaFX is an open source, next generation client application platform for desktop, mobile and embedded systems built on Java.”

Why am I bringing up JavaFX when I’m currently not doing much Java programming? The reason is Kotlin and TornadoFX. As I mentioned in a previous blog post, Kotlin is a separate language that targets the JVM. TornadoFX is also a separate GUI language. However, it is written in Kotlin and uses JavaFX as the base for all its graphical constructs. In other words, Java and JavaFX go together the same way as Kotlin and TornadoFX go together. But TornadoFX is actually JavaFX wrapped in some Kotlin constructs. Confusing? Let me try to explain by way of a simple example inspired by the book

Learn JavaFX 17: Building User Experience and Interfaces with Java 2nd ed. Edition by  Kishori Sharan and Peter Späth.

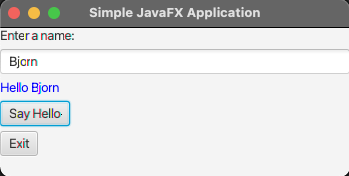
Here is the output of the simple JavaFX app. It has two labels, one textfield and two buttons. The user enters a name in the textfield and clicks the “Say Hello” button to get a greeting. When done you click the “Exit” button.

Output from a simple JavaFX application.

While being a very simple App it illustrates several important aspects of any GUI:

  • How to invoke the App and make a window visible.
  • How to enter text that can be consumed by the App.
  • How to create buttons that respond when clicked.
  • How to display output created by the App.

The code below shows how the App is constructed using Java and JavaFX.

import javafx.application.Application;
import javafx.application.Platform;
import javafx.scene.Scene;
import javafx.scene.control.Button;
import javafx.scene.control.Label;
import javafx.scene.control.TextField;
import javafx.scene.layout.VBox;
import javafx.stage.Stage;

public class SimpleFXApp extends Application {
    public static void main(String[] args) {
        Application.launch(args);
    }

    @Override
    public void start(Stage stage) {
        Label nameLabel = new Label("Enter a name:");
        TextField nameField = new TextField();

        Label msg = new Label();
        msg.setStyle("-fx-text-fill: blue;");

        // Create buttons
        Button sayHelloButton = new Button("Say Hello");
        Button exitButton = new Button("Exit");

        // Add the event handler for the Say Hello button
        sayHelloButton.setOnAction(e -> {
            String name = nameField.getText();
            if (name.trim().length() > 0) {
                msg.setText("Hello " + name);
            } else {
                msg.setText("Hello to you");
            }
        });

        // Add the event handler for the Exit button
        exitButton.setOnAction(e -> Platform.exit());

        // Create the root node
        VBox root = new VBox();

        // Set the vertical spacing to 5px
        root.setSpacing(5);

        // Add children nodes to the root node
        root.getChildren().addAll(nameLabel, nameField, msg, sayHelloButton, exitButton);

        Scene scene = new Scene(root, 350, 150);
        stage.setScene(scene);
        stage.setTitle("Simple JavaFX Application");
        stage.show();
    }
}

TornadoFX

Now let’s explore how we can write the same simple App using Kotlin and TornadoFX https://tornadofx.io.

Since TornadoFX lends itself nicely to MVC, I chose this file structure for the example. Thus, the first code snippet is just the View. It practically reads like prose in that labels, a textfield and two buttons are introduced by the builder functions. More on those later.

package view

import app.Styles
import controller.ViewController
import tornadofx.*
import kotlin.system.exitProcess

class MainView : View("Simple TornadoFX Application") {

    private val viewController: ViewController by inject()

    override val root = vbox {
        spacing = 5.0

        label("Enter a name:")
        textfield(viewController.name)
        label(viewController.labelText) {
            addClass(Styles.heading)
        }
        button("Say Hello") {
            action {
                viewController.makeGreeting()
            }
        }
        button("Exit") {
            action {
                exitProcess(0)
            }
        }
    }
}

Next we introduce the view controller code. It holds the values of the output (labelText) and the input textfield (name). It also contains the function that makes the greeting when the “Hello button” is clicked.

Notice that the MainView is derived from a View and that the ViewController is derived from a Controller. Both View and Controller are Singletons meaning that only one object of each class is constructed in the application. The view knows about the controller by “inject()”. The controller is instantiated the first time it is used in the view. The view is instantiated by the App as shown below.

package controller

import javafx.beans.property.SimpleStringProperty
import tornadofx.*

class ViewController: Controller() {

    val labelText = SimpleStringProperty()
    val name = SimpleStringProperty()

    fun makeGreeting() {
        val enteredName = name.value
        if (enteredName.trim().isNotEmpty()) {
            labelText.value = "Hello $enteredName"
        } else {
            labelText.value = "Hello to you"
        }
    }
}

We need two other pieces for the TornadoFX App to function properly. The first is the stage (window) for the application by settings its size and making it display. The MainView singleton is instantiated at the start of the App.

package app

import javafx.stage.Stage
import tornadofx.*
import view.MainView

class MyApp: App(MainView::class, Styles::class) {
    override fun start(stage: Stage) {
        with(stage) {
            width = 350.0
            height = 200.0
        }
        super.start(stage)
    }
}

The second piece is a Styles class that controls the font size and color.

package app
import javafx.scene.text.FontWeight
import tornadofx.*

class Styles : Stylesheet() {
    companion object {
        val heading by cssclass()
    }

    init {
        label and heading {
            padding = box(2.px)
            fontSize = 20.px
            fontWeight = FontWeight.BOLD
            textFill = c("blue")
        }
    }
}

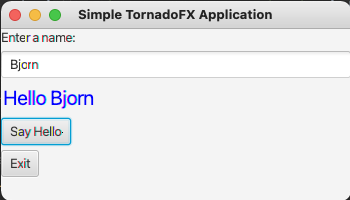
By running the Kotlin/TornadoFX code we get the same output as in the Java example.This should not be surprising given that JavaFX is the engine that drives TornadoFX. What should be surprising (at least it was to me) is how the TornadoFX code can look so simple and not explicitly mention objects and classes of types TextField, Label, Button, etc.? I will try to explain below.

Output from a simple TornadoFX application.

Kotlin Magic

TornadoFX manages to invoke all the same JavaFX code that Java uses but in a much more streamlined fashion. This is possible by use of Kotlin’s extension functions and trailing lambdas.

Let’s compare the implementation of the “Hello button” both in Java and Kotlin. In Java we have the following code snippet:

        Button sayHelloButton = new Button("Say Hello");
        
        sayHelloButton.setOnAction(e -> {
            String name = nameField.getText();
            if (name.trim().length() > 0) {
                msg.setText("Hello " + name);
            } else {
                msg.setText("Hello to you");
            }
        });

In TornadoFX we don’t mention the class Button. Instead we call a function with the name “button” (lowercase “b”):

        button("Say Hello") {
            action {
                viewController.makeGreeting()
            }
        }
    fun makeGreeting() {
        val enteredName = name.value
        if (enteredName.trim().isNotEmpty()) {
            labelText.value = "Hello $enteredName"
        } else {
            labelText.value = "Hello to you"
        }
    }

The question is, how does the TornadoFX code generate the same code as JavaFX? The answer lies in the use of Kotlin extension functions and lambdas to construct builder functions. For example, look at the extension function “button” below taken from the TornadoFX’s controls library https://github.com/edvin/tornadofx/blob/master/src/main/java/tornadofx/Controls.kt#L309-L314. It takes three arguments, a String, a graphic node and a lambda function. The function is set equal to a JavaFX Button which in turn attaches the lambda function to itself.

In the example above, the lambda function is the function “action”, defined in the code below. It is also an extension function and it takes only one argument, a lambda function.

fun EventTarget.button(text: String = "", graphic: Node? = null, op: Button.() -> Unit = {}) = Button(text).attachTo(this, op) {
    if (graphic != null) it.graphic = graphic
}

fun ButtonBase.action(op: () -> Unit) = setOnAction { op() }

If you combine the result of the builder function, button(…), and its member function, action(…), you get the effect of a JavaFX Button handling an action event as illustrated below.

        button("Say Hello") {
            action {
                viewController.makeGreeting()
            }
        }

        ===

        Button("Say Hello").onAction = EventHandler { e: ActionEvent? -> viewController.makeGreeting() }

Discussion

TornadoFX offers a set of Kotlin constructs operating on JavaFX that makes it possible to build GUI’s simply and cleanly. I have not done any complex interfaces with TornadoFX yet but I plan on using it going forward.

Categories
Distillation control Dynamic Modeling Kotlin Model-View-Controller Process Control

A Column Simulation Model

Introduction

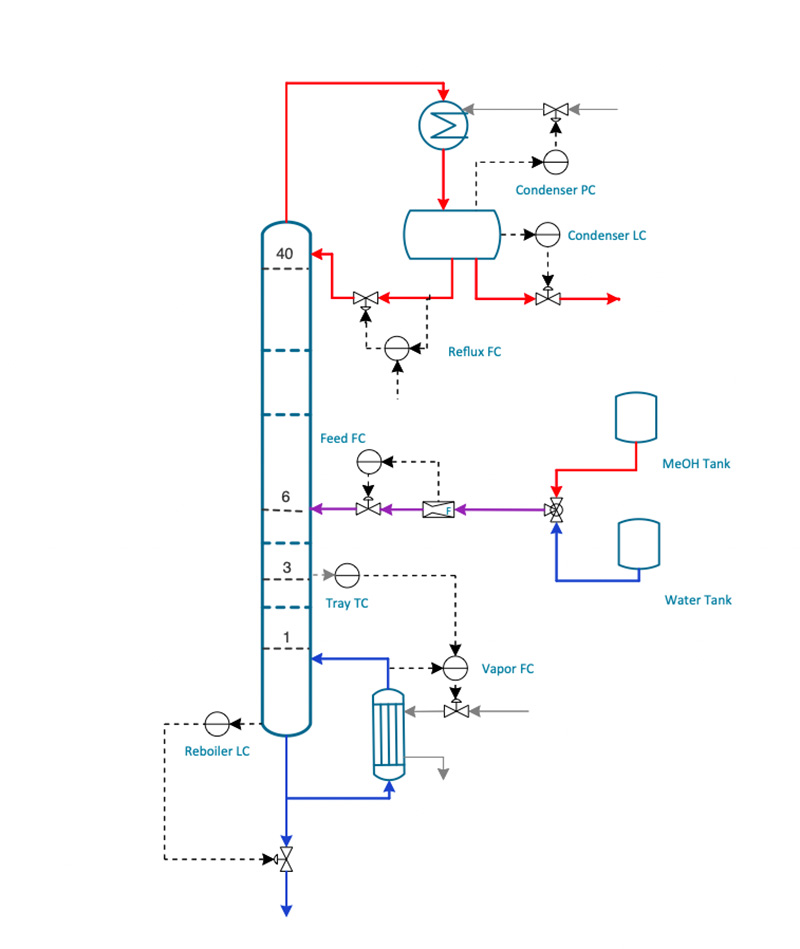
In my previous post I introduced the use of the build system Gradle and showed how it can be used to build Kotlin applications. As an example, I created a new project, “ColumnSimulation”, aimed at simulating a distillation column with a realistic control system. The column with its controls are shown in the picture below.

Binary distillation column separating methanol and water.

This is a conventional distillation column separating a 50/50 mixture of methanol and water. It has a total of 40 trays with 75% tray efficiency. Feed enters on tray 6 and the temperature on tray 3 is measured and controlled.

The system has 7 controllers where two are operated in a cascade arrangement (the Tray TC and the Vapor FC).

Object-Oriented Modeling

I use an object-oriented approach to modeling in order to retain maximum flexibility and code reusability. Thus, all units you see in the picture are represented by software classes stored in my SyMods library. In other words, the tray section, the reboiler, the condenser, the feed system, and the controllers are all units that can be configured for the application at hand. I’ve even combined the tray section, the reboiler and the condenser into a composite class called a “ColumnWtotalCondenser”. This saves me a bit of configuration effort every time I need a column of that type.

Given that I have all the pieces to the simulation pre-made, what remains to be done? I need to instantiate the classes into objects, configure them and make the connections corresponding to the process diagram. During this effort it is useful to do further grouping such as collecting all the controllers into another composite class called DCS (short for distributed control system). Notice that I use the Builder pattern to configure my controllers. There are other ways of doing this in Kotlin but the builder pattern is generic and works well in situations with many parameters. Also please note that the code type says “Swift” and not Kotlin. At this point Kotlin was not an option and Swift is sufficiently close in its syntax not to confuse the keywords of Kotlin too much.

class DCS: DCSUnit() {
    val feedFlowController = PIDController.Builder().
        gain(0.2).
        resetTime(0.002).
        directActing(false).
        pvMax(3000.0).
        sp(1634.0).
        output(0.25).
        build()
    val trayTemperatureController = PIDController.Builder().
        gain(0.75).
        resetTime(0.3).
        analyzerTime(0.025).
        pvMax(150.0).
        sp(92.0).
        directActing(false).
        output(0.5).
        build()
    val boilupFlowController = PIDController.Builder().
        gain(0.2).
        resetTime(0.01).
        analyzerTime(0.0).
        pvMax(2000.0).
        sp(1319.0).
        directActing(false).
        output(0.33).
        build()
    val reboilerLevelController = PIDController.Builder().
        resetTime(0.5).
        output(0.5).
        build()
    val condenserLevelController = PIDController.Builder().
        resetTime(0.5).
        pvMax(110.0).
        output(0.25).
        build()
    val condenserPressureController = PIDController.Builder().
        resetTime(0.1).
        output(0.5).
        pvMax(2.0).
        sp(1.0).
        build()
    val refluxFlowController = PIDController.Builder().
        gain(0.2).
        resetTime(0.002).
        analyzerTime(0.0).
        directActing(false).
        pvMax(3200.0).
        sp(831.0).
        output(0.25).
        build()
    init {
        with(controllers) {
            add(feedFlowController)
            add(trayTemperatureController)
            add(boilupFlowController)
            add(reboilerLevelController)
            add(condenserLevelController)
            add(condenserPressureController)
            add(refluxFlowController)
        }
    }
}

This took care of the control system setup. Next I configure the rest of the process by creating two reference fluid objects and instantiating the two process objects (Feeder and Column). The so-called reference fluids (refVapor and refLiq) are made in two steps. The first step is to instantiate a local dictionary object, factory, from a component file I’ve created using publicly available databases. In the second step I call a member function on the factory object with the names of the components I wish to include. The function searches a hard coded dictionary of Wilson activity parameters and creates an ideal vapor phase and a non-ideal liquid phase. These fluids are used as templates in all objects that require them. Finally, I connect the controllers to the process. All of that is part of the model class below.

class ProcessModel(var dcsUnit: DCS) {
    val ode = ODEManager()
    val factory = FluidFactoryFrom("/Users/bjorntyreus/component_file2.csv")
    val vl = factory.makeFluidsFromComponentList(listOf("Methanol", "Water"))
    val refVapor = vl?.vapor ?: throw IllegalStateException("Did not get a vapor")
    val refLiq = vl?.liquid ?: throw IllegalStateException("Did not get a liquid")

    val feed = Feeder(identifier = "Feed",
        composition = listOf(0.5, 0.5),
        initialFlow = 1600.0,
        minFlow = 0.0,
        maxFlow = 2000.0,
        operatingTemperature = 100.0,
        maxTemperature = 100.0,
        operatingPressure = 1.2,
        maxPressure = 3.0,
        refVapor = refVapor,
        refLiquid = refLiq)
    val column = ColumnWtotalCondenser(identifier = "column",
        numberOfTrays = numberOfTrays,
        feedRate = 1600.0,
        distillateRate = 800.0,
        refluxRatio = 1.0,
        topPressure = 1.0,
        trayDP = 0.005,
        trayEfficiency = 0.75,
        coolantInletTemperature = 25.0,
        trayDiameter = 3.0,
        lightKey = "Methanol",
        heavyKey = "Water",
        refVapor = refVapor,
        refLiq = refLiq)
    init {
        with(ode.units) {
            add(feed)
            add(column)
            add(dcsUnit)
        }
        column.trays[feedTrayLocation].liquidFeed = feed.liquidOutlet

        with(dcsUnit) {
            trayTemperatureController.pvSignal = column.trays[temperatureTrayLocation].temperatureTT
            trayTemperatureController.outSignal = boilupFlowController.exSpSignal
            trayTemperatureController.efSignal = boilupFlowController.normPvSignal
            boilupFlowController.slave = true

            boilupFlowController.pvSignal = column.reboiler.vaporBoilupFT
            boilupFlowController.outSignal = column.reboiler.heatInputAC
            boilupFlowController.efSignal = column.reboiler.heatInputAC
            column.reboiler.heatInputAC.useProcessInput = false

            reboilerLevelController.pvSignal = column.reboiler.levelLT
            reboilerLevelController.outSignal = column.reboiler.outletValveAC
            reboilerLevelController.efSignal = column.reboiler.outletValveAC
            column.reboiler.outletValveAC.useProcessInput = false

            feedFlowController.pvSignal = feed.feedRateFT
            feedFlowController.outSignal = feed.feedValveAC
            feedFlowController.efSignal = feed.feedValveAC
            feed.feedValveAC.useProcessInput = false

            condenserLevelController.pvSignal = column.condenser.levelLT
            condenserLevelController.outSignal = column.condenser.outletValveBAC
            condenserLevelController.efSignal = column.condenser.outletValveBAC
            column.condenser.outletValveBAC.useProcessInput = false

            condenserPressureController.pvSignal = column.condenser.pressurePT
            condenserPressureController.outSignal = column.condenser.coolantValveAC
            condenserPressureController.efSignal = column.condenser.coolantValveAC
            column.condenser.coolantValveAC.useProcessInput = false

            refluxFlowController.pvSignal = column.condenser.liquidOutletAFT
            refluxFlowController.outSignal = column.condenser.outletValveAAC
            refluxFlowController.efSignal = column.condenser.outletValveAAC
            column.condenser.outletValveAAC.useProcessInput = false
        }

    }
}

Notice how each controller connection requires four actions: 1) The controlled signal needs to be connected (pvSignal). 2) The output from the controller needs to be connected (outSignal). 3) The external feedback signal is then connected (efSignal). Often this signal is the same as the final control element except in cascade arrangements. 4) We have to make sure that the final control element responds to the attached control signal as opposed to retaining whatever process value that is given to it (e.g. during initialization).

We now have a process with its control system attached. Time to subject these to the integration system, prepare for data collection and design a test suite. This is done in the columnSimulation function below. Notice in particular how transparent it is to specify the timing for various tests by using Kotlin’s when expression in conjunction with ranges. It should be pretty clear from the code that during the span of 16 hours we are subjecting the process to the following changes:

  • Boilup controller switching from Auto to Cascade
  • Tray TC switching from Auto to Manual
  • ATV test on Tray TC
  • Tray TC back to Auto
  • Tray TC setpoint change 92 -> 85 oC
  • Applied results from ATV test and changed setpoint back to 92 oC
  • Feed composition change from 50/50 to 40/60 methanol/water
  • Feed flow increase by roughly 10%
fun columnSimulation(discr: DiscretizationModel, control: StepSizeControlModel): List<Plot> {
    // Prepare process for integration
    val dcsUnit = DCS()
    val model = ProcessModel(dcsUnit)
    val ode = model.ode
    
    // Instantiate, configure and start integrator
    val ig = IntegrationServer(discr, control)
    val dim = ode.dimension()
    val x = DoubleArray(dim)
    val endTime = 16.0
    ig.ode = ode
    ig.initialStepSize = 1.0e-3
    val reportingInterval = 0.05
    val dt = reportingInterval / 2.0
    var localTime = 0.0
    var reportTimer = 0.0
    ig.startTime = 0.0
    ig.start(ode.initialConditionsUsingArray(x))
    
    // Create lists to hold the dynamic data from a run
    val timeList = mutableListOf<Double>()
    val tempList = mutableListOf<Double>()
    val pressureList = mutableListOf<Double>()
    val tcOutList = mutableListOf<Double>()
    val boilupList = mutableListOf<Double>()
    val reboilLevelList = mutableListOf<Double>()
    val condenserLevelList = mutableListOf<Double>()
    val h20OHList = mutableListOf<Double>()
    val meohBtmsList = mutableListOf<Double>()
    val btmsFlowList = mutableListOf<Double>()
    val distList = mutableListOf<Double>()
    val feedRateList = mutableListOf<Double>()
    val feedCmpList = mutableListOf<Double>()
    val plotList = mutableListOf<Plot>()
    var atvGain = dcsUnit.trayTemperatureController.gainATV
    var atvReset = dcsUnit.trayTemperatureController.resetTimeATV
    var reductFactor = dcsUnit.trayTemperatureController.resetReductionFactor

    // Simulate and collect data
    while (localTime <= endTime) {
        localTime = ig.currentTime
        ig.startTime = localTime
        ig.endTime = localTime + dt
        ig.continueCalculations()
        localTime = ig.currentTime
        reportTimer += dt
        if (reportTimer > reportingInterval) {
            reportTimer = 0.0
            //println("time= $localTime, Tank temp = ${model.tank.tankTemperatureTT.processValue}")
            timeList.add(localTime)
            tempList.add(model.column.trays[temperatureTrayLocation].temperatureTT.processValue)
            pressureList.add(model.column.condenser.pressurePT.processValue)
            val tcOut = model.dcsUnit.trayTemperatureController.outSignal?.signalValue ?: 0.0
            tcOutList.add(tcOut * 100.0)
            boilupList.add(model.column.reboiler.vaporBoilupFT.processValue)
            reboilLevelList.add(model.column.reboiler.levelLT.processValue)
            condenserLevelList.add(model.column.condenser.levelLT.processValue)
            h20OHList.add(model.column.condenser.liquidHoldup.weightFractions[1] * 1.0e6)
            meohBtmsList.add(model.column.reboiler.reboilerHoldup.weightFractions[0] * 1.0e6)
            btmsFlowList.add(model.column.reboiler.outletFlowFT.processValue)
            distList.add(model.column.condenser.liquidOutletBFT.processValue)
            feedRateList.add(model.feed.feedRateFT.processValue)
            feedCmpList.add(model.feed.feedComposition[0] * 100.0)

            // Perform test on the system at specified time points
            val wholeHours = localTime.toInt()
            with (dcsUnit) {
                when (wholeHours) {
                    in 1..3 -> boilupFlowController.controllerMode = ControlMode.cascade
                    in 3..4 -> {
                        trayTemperatureController.controllerMode = ControlMode.manual
                        trayTemperatureController.output = 0.92
                    }
                    in 4..6 -> {
                        trayTemperatureController.h = 0.10
                        trayTemperatureController.controllerMode = ControlMode.autoTune
                        atvGain = trayTemperatureController.gainATV
                        atvReset = trayTemperatureController.resetTimeATV
                        reductFactor = trayTemperatureController.resetReductionFactor
                    }
                    in 6..7 -> {
                        trayTemperatureController.controllerMode = ControlMode.automatic
                        trayTemperatureController.sp = 92.0
                    }
                    in 7..8 -> {
                        trayTemperatureController.controllerMode = ControlMode.automatic
                        trayTemperatureController.sp = 85.0
                    }
                    in 8..9 -> {
                        trayTemperatureController.gain = atvGain / 2.0
                        trayTemperatureController.resetTime = atvReset
                        trayTemperatureController.sp = 92.0
                    }
                    in 10..12 -> {
                        model.feed.currentComposition = listOf(0.4, 0.6)
                    }
                    in 12..14 -> feedFlowController.sp = 1800.0
                }
            }
        }
    }

The actual start of the program is trivially simple. In the main function I call the columnSimulation function and get a list of plots back. Six of these I display in one figure and the other six go to the second figure. The whole operation of simulating the 40 tray column for 16 hours takes 1.6 seconds on a 2014 vintage MacBook Pro. Kotlin is fast!

fun main(args: Array<String>) {
    val timeInMillis = measureTimeMillis {

        val plotGroup = columnSimulation(DiscretizationModel.ModifiedEuler, StepSizeControlModel.FixedStepController)

        val group1 = plotGroup.take(6)
        val group2 = plotGroup.drop(6)
        gggrid(group1, ncol = 2, cellWidth = 470, cellHeight = 300).show()
        gggrid(group2, ncol = 2, cellWidth = 470, cellHeight = 300).show()

    }
    println("(The operation took $timeInMillis ms)")
}

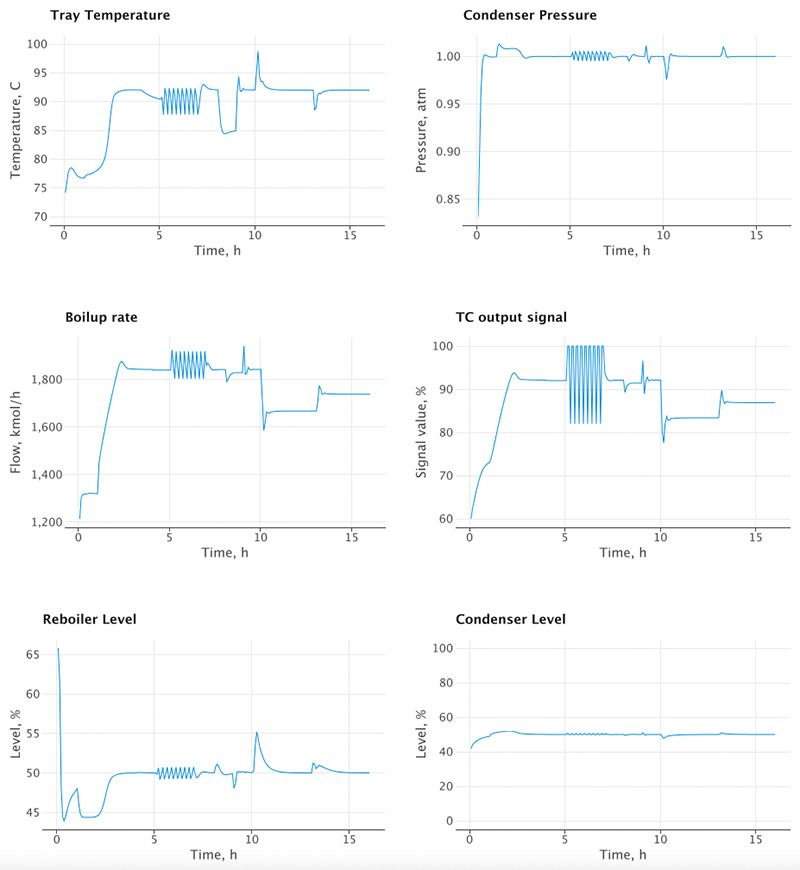
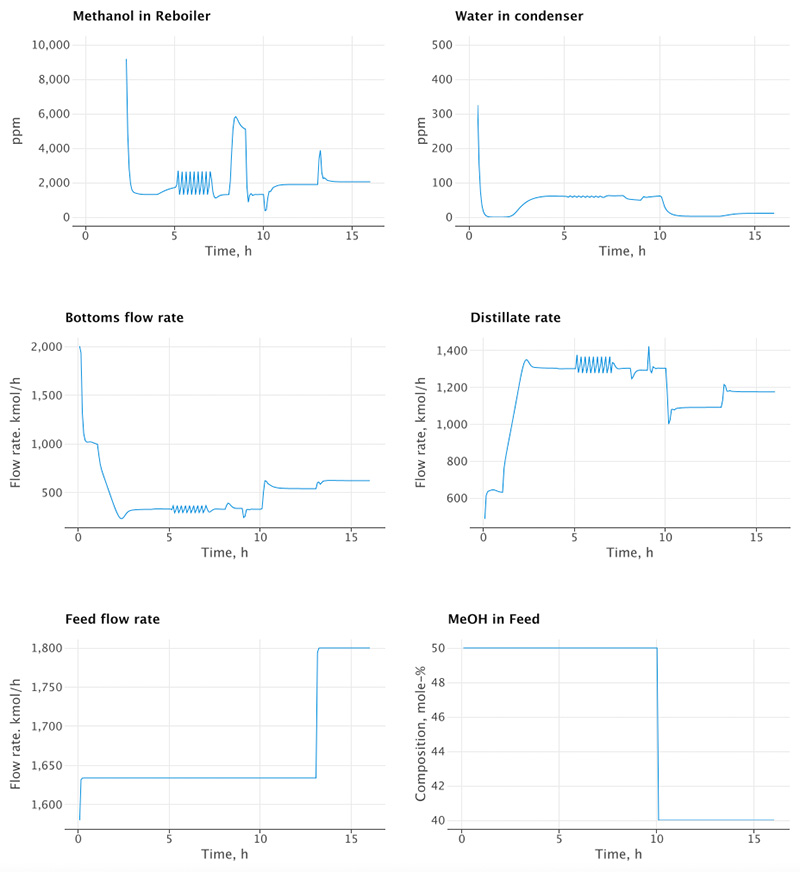
Below I show the results of the simulation run described in the code.

Performance of control system for the 40 tray column. Pay particular attention to the Tray Temperature Controller behavior (upper left). It is activated (cascade with Boilup) after 1 hour of operation but responds slowly due to poor tuning. After the ATV test the old tuning parameters remain for one setpoint change (at hour 7). The new tuning parameters are set at hour 8 just before a final setpoint change to 92 oC. After that both feed composition and feed rate change in steps of 10%. Temperature is held close to setpoint in the face of these disturbances.
This figure shows how the important composition variables behave in the face of temperature setpoint changes and external disturbances. Notice that the ATV test itself causes only minor deviations in the compositions. The control system is also quite robust against feed rate and composition changes.

MVC

An important concept in software engineering is the separation of a Model from its View and the software Controller used to manipulate both the view and the model. The Model-View-Controller (MVC) concept is important because it enables software reuse, provides flexibility in the choice of views and controllers and it facilitates trouble shooting and debugging.

While this post is primarily aimed at demonstrating modeling with Kotlin and Let’s plot, it also provides me with an opportunity to dwell a bit on MVC.

In the example above it should be clear that the model in my MVC is the class “ProcessModel”. It consists of the column, the feeder and the feedback control system. But the model does nothing by itself, it needs to be driven by an integrator and be told about changes to its environment. That’s the job of the controller.

Furthermore, the model has no built-in display capabilities or views. The reason is that you should be able to choose the view independently from the model. Only the controller will know about the view and will be feeding it with information from the model.

In my example the function columnSimulation(…) is the controller. It owns the model and the integrator and knows how to collect information to feed the plotting program Let’s plot. But we could have chosen another method to display the result. For example, the controller could have exported data to a text file that could have been used to display graphs in Excel. I have used that method many times.

To further drive home the flexibility of a well designed MVC I share an example simulation of the same distillation column on an iPad. Here the model is the same as above but implemented in Swift instead of Kotlin. However, the views and controllers are quite different. Instead of collecting data for static plots I update strip charts live as the simulation progresses. I also provide views and dedicated controllers for the PID controllers so the user can interact with them and provide tuning parameters while the simulation is running. This mode of operation is called interactive dynamic simulation and mimics running a real plant.

I’m currently exploring a user interface system (controllers and views) called TornadoFX. It has a set of Kotlin API’s for user interfaces and is built upon a well established UI system called JavaFX. I’m hoping to report progress on my findings in a future post.

Categories
Dynamic Modeling Kotlin Modeling Languages

Kotlin and Gradle

Introduction

As I mentioned in my previous post, my new favorite programming language is Kotlin. I particularly like it because it has much of Python’s flexibility but the speed of Java, an awesome combination. I’ve done a few execution speed comparisons and find that for dynamic simulations of my chemical engineering models, Kotlin is 10-15 times faster than Python.

Now, execution speed is not everything. Python’s ease of use and rich library of readily available packages account for a great deal of this language’s popularity. I described in a previous blog post how one can create virtual environments and use pip to safely download packages and manage their dependencies. This is a big deal and a huge advantage for Python. In particular the numerical package numpy and the plotting package matplotlib are hard to beat.

So the purpose of today’s post is to ask what are the Kotlin equivalents to virtual environments, pip, numpy and matplotlib? The short answer is Gradle and Lets-Plot. I elaborate below.

Gradle

Gradle is an open-source build automation tool (https://gradle.org). You can download Gradle separately and use it to build almost any software project. Personally I use the plug-in provided in JetBrains IntelliJ IDEA tool. Since it took me a bit of research and tinkering before I figured out how to use Gradle, I decided to share my findings here and perhaps help others who are new to Kotlin and Gradle.

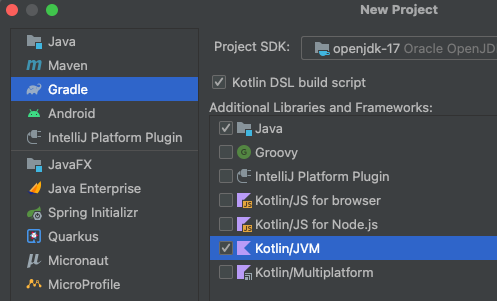
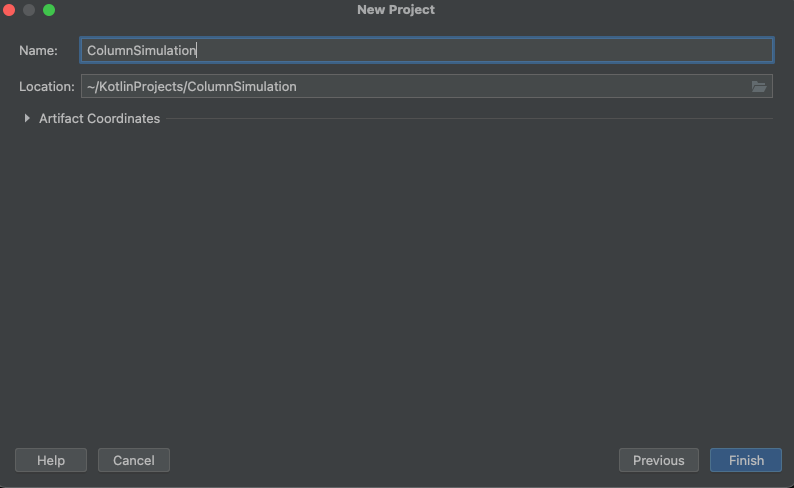
The first step in the process is to create a new Gradle project from IntelliJ. This looks as follows:

The New Project window in IntelliJ IDEA. Make note of all the selected and checked fields

The next step is to give the project a name. I call this ColumnSimulation since I will be constructing a dynamic simulation of a distillation column with PID controllers.

After clicking “Finish” I have a ready-made Gradle project that I can start populating with source code. But before I do that I’d like to link this new project to another Gradle project where I have most of my reusable process and instrument models. This other project I’ve named SyMods. This is how I link the two together.

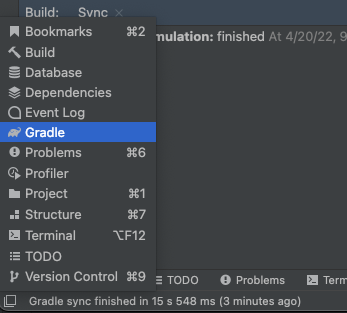
First click on the little icon at the bottom left corner of the IntelliJ IDE. From the pop-up, select Gradle as in the picture below.

Pop-up window from clicking the lower left icon on IntelliJ IDEA.

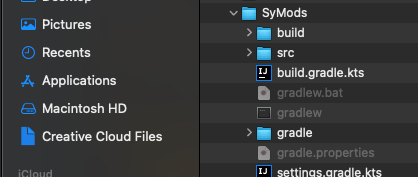
This opens the Gradle window on the right hand side of the IDE. The ‘+’ sign at the top of the Gradle window allows you to add another Gradle project to be linked with the first. By selecting the “build.gradle.kts” within the SyMods project, I can now add this project as a companion project to my newly created ColumnSimulation project.

Find the second Gradle project in the file system and click on the build.gradle.kts file to include it.

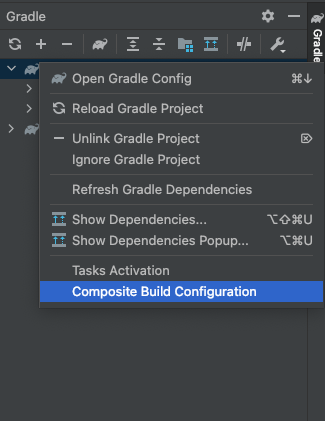
Both projects then show up in the Gradle window. By right-clicking on the ColumnSimulation project I can tell the build system that I want a “Composite Build Configuration”. Both projects are then built together.

Gradle window showing two projects. Right-click the first and select Composite Build

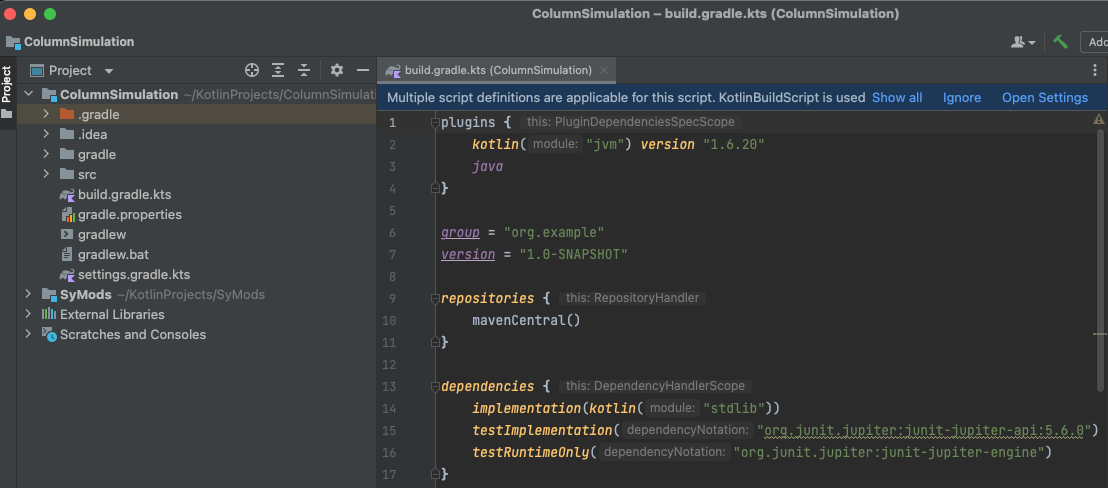
I close the Gradle window and focus on the Project window on the left side of the IDE. It looks like the picture below where I have the “build.gradle.kts” file open for the ColumnSimulation project. I now add some dependencies particularly for plotting.

Gradle window closed and focus is on the two projects.

Lets-Plot and Other Dependencies

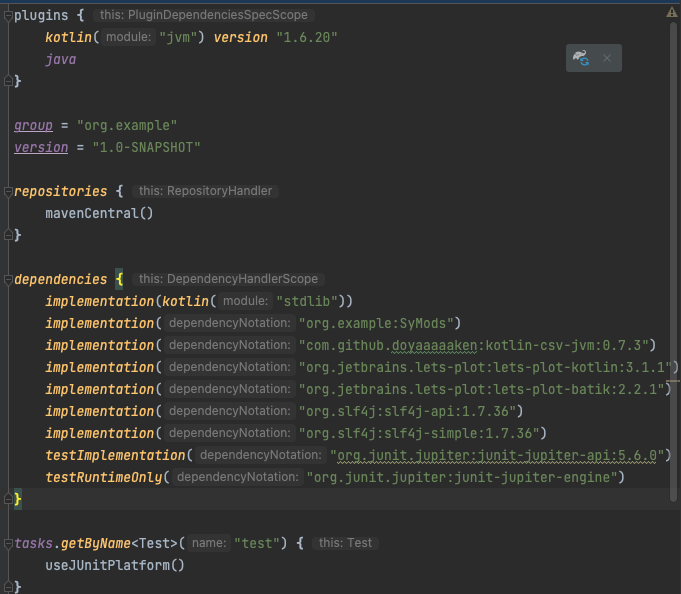
One of the beauties of Gradle is that it manages external libraries and dependencies for you. All you have to do is find the URL to the particular library you want to include and add this to the dependency section of the build.gradle.kts file. Below I show how I have added the appropriate links for JetBrains’ Lets-plot library. I also added a library for working with csv files and finally told the ColumnSimulation project that I will be importing models from my own project SyMods (that I previously linked and will be built along with my ColumnSimulation project).

Dependencies added to the gradle.build file. Notice the little Gradle icon in the upper right corner of this picture. To update the build configuration, this icon should be clicked after changes have been made to the build file.

We are now ready to write some application code. Notice that by having my “library” project, SyMods, available as a linked project I can make changes in the library as if I were working on it separately. This is very useful since I often discover some features in the application that could be reused and thus belong in the library.

Summary

Kotlin has proven to be an effective language in writing dynamic simulation models. To manage projects with Kotlin and to provide external libraries and dependencies, Gradle is the preferred tool. I have shown how to make a Gradle project, link it to other projects and include external dependencies for reading csv-files and plotting.

Categories
Dynamic Modeling Modeling Languages

FORTRAN, C, Java, Swift, Python and Kotlin

Introduction

I’ve implemented dynamic simulation models for chemical engineering applications for more than 50 years now, and am still doing it. You would think it should have gotten pretty old by now, but truth is, it is still fascinating to me. The model principles have not changed but the tools to get them into a computer have.

In this post I will take you on a 50 year journey through a language landscape I personally visited. I’m not covering every language I’ve used along the way but focussing on two old ones; FORTRAN and C, one intermediate, Java, and three for me new ones; Swift, Python and Kotlin. The examples will give me an opportunity to highlight some problems with the old languages later solved by the newer ones.

The example I’ll use for this post is how to implement an interpolation method based on Cubic Splines. You can easily find explanations of what Cubic Splines are but this brief intro is good for starters: https://mathworld.wolfram.com/CubicSpline.html

Admittedly, I don’t use splines very often in my dynamic modeling work but I chose these because both FORTRAN and C codes are well documented (see Forsythe et. al. Computer Methods for Mathematical Computations Prentice-Hall, Inc., 1977 and Press et. al. Numerical Recipes in C 2nd ed., Cambridge University Press 1992). For both the FORTRAN and C codes I have typed in the code from the two books. Since I don’t have a FORTRAN compiler anymore, I have not been able to check that code directly. I do have C compilers and verified that the C code works as expected. The other codes are my own translations from the original FORTRAN code. They also work as they should.

FORTRAN

Back in the 70’s when I started computer modeling in all earnest, FORTRAN was pretty much the only game in town for scientific and engineering calculations. Code was entered on punch cards (I had boxes full of them) and ran on multi-million dollar mainframe computers that were slower than my current iPhone or iPad!

As you can tell from the code fragments below, the formatting was very strict; only one line per card, short variable names (often just a single letter), code had to start at the 7th column (as I recall), comment lines started with a capital C in the left most column, etc.

Awkward as it was to work with punch cards and slow computers, I have to admit that FORTRAN as a language was pretty easy to learn and work with. It had a very limited syntax and no fancy constructs or external libraries to remember. And certainly no pointers or memory management to worry about (more on that later). And you have to agree with me, the code is very readable. All caps, each row starting at the same place, no squiggly brackets or semicolons, just plain text. As you see the code snippet of C below, you will appreciate the clean looking nature of FORTRAN.

But there is one nasty feature that I just have to mention and that is the GO TO statement and the line numbers. For example, in the first subroutine, a few code lines down, there is a statement “IF ( N .LT. 3 ) GO TO 50“. It says that if there are less than 3 data points available, go to the line in the code with the label “50”. That is towards the end of the subroutine. I used to joke with my friends and say that the GO TO is not the problem, it’s the “WHERE FROM” that causes all the headache. To understand what I’m talking about you have to image sifting through paper printouts of hundreds of lines of code and seeing some lines with a number next to them. If the number was not followed by the word CONTINUE you had to suspect that it was part of a potentially distant GO TO statement. Debugging was hard as you basically had to manually inspect the code and try to figure out what was wrong. The best medicine was to get it right the first time around. Also, breaking the code into smaller functions and subroutines was also a good way of isolating problems and avoid GO TO’s.

SUBROUTINE SPLINE(N, X, Y, B, C, D)
      INTEGER N
      REAL X(N), Y(N), B(N), C(N), D(N)
C  THE COEFFICIENTS B(I), C(I), AND D(I), I=1,2,...,N ARE COMPUTED
C  FOR A CUBIC INTERPOLATING SPLINE
C
C   S(X) = Y(I) + B(I)*(X-X(I)) + C(I)*(X-X(I))**2 + D(I)*(X-X(I))**3
C   FOR X(I) .LE. X .LE. X(I+1)
C
C  INPUT..
C
C   N = THE NUMBER OF DATA POINTS OR KNOTS (N.GE.2)
C   X = THE ABSCISSAS OF THE KNOTS IN STRICTLY INCREASING ORDER
C   Y = THE ORDINATES OF THE KNOTS
C
C  OUTPUT..
C
C   B, C, D = ARRAYS OF SPLINE COEFFICIENTS AS DEFINED ABOVE
C
C  USING P TO DENOTE LEVEL OF DIFFERENTIATION
C
C   Y(I) = S(X(I))
C   B(I) = SP(X(I))
C   C(I) = SPP(X(I))/2
C   D(I) = SPPP(X(I))/6 (DERIVATIVE FROM THE RIGHT)
C
C  THE ACCOMPANYING FUNCTION SUBPROGRAM SEVAL CAN BE USED
C  TO EVALUATE THE SPLINE
C
      INTEGER NM1, IB, I
      REAL T
C
      NM1 = N-1
      IF ( N .LT. 2 ) RETURN
      IF ( N .LT. 3 ) GO TO 50
C
      D(1) = X(2) - X(1)
      C(2) = (Y(2) - Y(1))/D(1)
      DO 10 I = 2, NM1
        D(I) = X(I+1) - X(I)
        B(I) = 2.*(D(I-1) + D(I))
        C(I+1) = (Y(I+1) - Y(I))/D(I)
        C(I) = C(I+1) - C(I)
   10 CONTINUE
C
      B(1) = -D(1)
      B(N) = -D(N-1)
      C(1) = 0.
      C(N) = 0.
      IF ( N .EQ. 3 ) GO TO 15
      C(1) = C(3)/X(4)-X(2)) - C(2)/(X(3)-X(1))
      C(N) = C(N-1)/(X(N)-X(N-2)) - C(N-2)/(X(N-1)-X(N-3))
      C(1) = C(1)*D(1)**2/(X(4)-X(1))
      C(N) = -C(N)*D(N-1)**2/(X(N)-X(N-3))
C
C  FORWARD ELIMINATION
C
   15 DO 20 I = 2, N
        T = D(I-1)/B(I-1)
        B(I) = B(I) - T*D(I-1)
        C(I) = C(I) - T*C(I-1)
   20 CONTINUE
C
C  BACK SUBSTITUTION
C
      C(N) = C(N)/B(N)
      DO 30 IB = 1, NM1
         I = N-IB
         C(I) = (C(I) - D(I)*C(I+1))/B(I)
   30 CONTINUE
C
C  COMPUTE POLYNOMIAL COEFFICIENTS
C
      B(N) = (Y(N) - Y(NM1))/D(NM1) + D(NM1)*(C(NM1) + 2.0*C(N))
      DO 40 I = 1, NM1
         B(I) = (Y(I+1) - Y(I))/D(I) - D(I)*(C(I+1) + 2.0*C(I))
         D(I) = (C(I+1) - C(I))/D(I)
         C(I) = 3.*C(I)
   40 CONTINUE
      C(N) = 3.*C(N)
      D(N) = D(N-1)
      RETURN
C
   50 B(1) = (Y(2)-Y(1))/X(2)-X(1))
      C(1) = 0.
      D(1) = 0.
      B(2) = B(1)
      C(2) = 0.
      D(2) 0.
      RETURN
      END

      REAL FUNCTION SEVAL(N, U, X, Y, B, C, D)
      INTEGER N
      REAL U, X(N), Y(N), B(N), C(N), D(N)
C
C  THIS SUBROUTINE EVALUATES THE CUBIC SPLINE FUNCTION
C
C   SEVAL = Y(I) + B(I)*(U-X(I)) + C(I)*(U-X(I))**2 + D(I)*(U-X(I))**3
C
      INTEGER I, J, K
      REAL DX
      DATA I/1/
      IF ( I .GE. N) I = 1
      IF ( U .LT. X(1) ) GO TO 10
      IF ( U .LE. X(I+1) ) GO TO 30
C
C  BINARY SEARCH
C
   10 I = 1
      J = N + 1
   20 K = (I + J)/2
      IF ( U .LT. X(K) ) J = K
      IF ( U .GE. X(K) ) I = K
      IF ( J .GT. I+1 ) GO TO 20
C
C  EVALUATE SPLINE
C
   30 DX = U - X(I)
      SEVAL = Y(I) + DX*(B(I) + DX*(C(I) + DX*D(I)))
      RETURN
      END

C

While FORTRAN was the best choice for scientific calculations on a mainframe, it was not useful for writing new operating systems or drivers for peripheral equipment. Those tasks were done in ASSEMBLY language requiring great programming skills. A better language was needed as the computer industry grew and different architectures became available. During the course of developing the operating system, UNIX, the engineers at Bell Labs devised a new, higher level language they named “C”. Just as FORTRAN was very restrictive as to how you could manipulate a computer, C is quite the opposite. We used to joke that when programming in C the language gives you a lot freedom and enough rope “to hang yourself”. The two biggest problems with C are the liberal use of pointers and the need for manual memory management. Both of those issues are illustrated in the two code snippets below.

The first code snippet defines the various functions used to compute the interpolating splines. The second snippet shows how to use these functions. Again, these codes are typed in from the Numerical Recipes in C book and are not using exactly the same algorithm as in the FORTRAN code. That’s ok because I’m just illustrating some significant differences between the two languages.

#include <stdio.h>
#include <stdlib.h>
#define NR_END 1
#define FREE_ARG char*

void nrerror(char error_text[])
{
    fprintf(stderr,"%s\n", error_text);
    exit(1);
}
float *vector(long nl, long nh)
{
    float *v;
    v=(float *)malloc((size_t) ((nh-nl+NR_END)*sizeof(float)));
    if (!v) nrerror("allocation failure in vector()");
    return v-nl+NR_END;
}
void free_vector(float *v, long nl, long nh)
{
    free((FREE_ARG) (v+nl-NR_END));
}

void spline(const float x[], const float y[], int n, float yp1, float ypn, float y2[])
{
    int i,k;
    float p,qn,sig,un,*u;

    u=vector(1,n-1);
    if (yp1 > 0.99e30)
        y2[1]=u[1]=0.0f;
    else {
        y2[1] = -0.5f;
        u[1]=(3.0f/(x[2]-x[1]))*((y[2]-y[1])/(x[2]-x[1])-yp1);
    }
    for (i=2;i<=n-1;i++) {
        sig=(x[i]-x[i-1])/(x[i+1]-x[i-1]);
        p=sig*y2[i-1]+2.0f;
        y2[i]=(sig-1.0f)/p;
        u[i]=(y[i+1]-y[i])/(x[i+1]-x[i]) - (y[i]-y[i-1])/(x[i]-x[i-1]);
        u[i]=(6.0f*u[i]/(x[i+1]-x[i-1])-sig*u[i-1])/p;
    }
    if (ypn > 0.99e30)
        qn=un=0.0f;
    else {
        qn=0.5f;
        un=(3.0f/(x[n]-x[n-1]))*(ypn-(y[n]-y[n-1])/(x[n]-x[n-1]));
    }
    y2[n]=(un-qn*u[n-1])/(qn*y2[n-1]+1.0f);
    for (k=n-1;k>=1;k--)
        y2[k]=y2[k]*y2[k+1]+u[k];
    free_vector(u,1,n-1);
}

void splint(const float xa[], const float ya[], const float y2a[], int n, float x, float *y)
{
    int klo,khi,k;
    float h,b,a;
    klo=1;
    khi=n;
    while (khi-klo > 1) {
        k=(khi+klo) >> 1;
        if (xa[k] > x) khi=k;
        else klo=k;
    }
    h=xa[khi]-xa[klo];
    if (h == 0.0f) nrerror("bad xa input to routine splint");
    a=(xa[khi]-x)/h;
    b=(x-xa[klo])/h;
    *y=a*ya[klo]+b*ya[khi]+((a*a*a-a)*y2a[klo]+(b*b*b-b)*y2a[khi])*(h*h)/6.0f;
}

Let’s first focus on the function “float *vector(long nl, long nh)” above. It claims that, given a starting index (nl) and an ending index (nh), the function will return a pointer to the beginning of a stretch of memory containing a string of real numbers of type float. The vector is allocated on the computer’s memory called the heap. This memory has to be reclaimed later or else we can run into serious issues during run time. The freeing of memory is done with the function “void free_vector(float *v, long nl, long nh)“. This function takes the pointer to the start of the memory that needs to be cleared along with the size of the vector.

In the application example below we see how we first allocate space for the vectors xa, ya, and y2 depending on how many data points, NP, we have. Inside the spline function we locally have another variable, u, that also needs memory before it can be used. Failing to allocate memory to a vector before it is used leads to a crash and failing to remove memory after it has been used can also eventually lead to a crash. Both of these bugs are hard to find.

But don’t get me wrong, despite its flaws, C was a great advance in computer science. It is incredibly flexible, terse, compact, and very fast. It is still used today for CPU and memory critical applications and is often the foundation for other languages (e.g. Python).

Before we leave the C code, I’d like you to pay attention to the reduced readability of the code compared to FORTRAN. The lower case is easier to type on a keyboard but harder to read, I think. The formatting is loose and optional since individual statements end with a semicolon and blocks of code are surrounded by squiggly brackets. Those features make it clear to the computer what to do but do not make it particularly clear to a human reading the code. There are good reasons for this. Back 40-50 years ago when computers were slow, CPU time was the limitation and code needed to be entered as efficiently as possible. Today computers are fast and “people time” is the limitation. There is much more emphasis on code clarity and readability as you will see in the modern language examples below.

#include <stdio.h>
#include <math.h>
#include "spline.h"
#define NP 10
#define PI 3.1415926

int main() {
    int i,nfunc;
    float f,x,y,yp1,ypn,*xa,*ya,*y2;

    xa=vector(1,NP);
    ya=vector(1,NP);
    y2=vector(1,NP);
    for (nfunc=1;nfunc<=2;nfunc++) {
        if (nfunc == 1) {
            printf("\nsine function from 0 to pi\n");
            for (i = 1; i < NP; i++) {
                xa[i] = (float) (i * PI / NP);
                ya[i] = (float) (sin(xa[i]));
            }
            yp1 = (float) cos(xa[1]);
            ypn = (float) cos(xa[NP]);
        } else if (nfunc == 2) {
            printf("\nexponential function from 0 to 1\n");
            for (i = 1; i < NP; i++) {
                xa[i] = (float) (i*1.0 / NP);
                ya[i] = (float) (exp(xa[i]));
            }
            yp1 = (float) exp(xa[1]);
            ypn = (float) exp(xa[NP]);
        } else {
            break;
        }

        spline(xa, ya, NP, yp1, ypn, y2);
        for (i = 1; i <= 10; i++) {
            if (nfunc == 1) {
                x = (float) ((-0.05 + i / 10.0) * PI);
                f = (float) sin(x);
            } else if (nfunc == 2) {
                x = (float) (-0.05 + i / 10.0);
                f = (float) exp(x);
            }
            splint(xa, ya, y2, NP, x, &y);
            printf("%12.6f %12.6f %12.6f\n", x, f, y);
        }
    }
    free_vector(y2,1,NP);
    free_vector(ya,1,NP);
    free_vector(xa,1,NP);
    return 0;
}

Object-Oriented Programming – Java

Alongside advances in hardware and the advent of the personal computer in the early 80’s, there was also a quest to organize programs around chunks of data rather than just using collections of subroutines and functions operating on banks of common data. The idea is this: instead of having a library of public functions that use public data as parameters (and also modify the same common data), how about focussing on separate chunks of data (objects) that could have special functions (methods) associated with them to modify their data? Data in one object are not shared with other objects unless specifically requested. This level of encapsulation proved to be very beneficial for productivity and error reduction. Logical errors, that is, since a good editor and development environment could point out syntax errors for you.

FORTRAN and C are both procedural languages and have no built-in mechanisms for object-orientation. A solution to this problem came from Bjarne Stroustrup at Bell Labs when he invented C++. The new language has often been called a “better C”, but it is more than that. It has natural ways of creating classes and creating objects from them. While pointers and memory management are still present in the language they are greatly simplified for the programmer. Best of all, C++ is compiled and has the same great speed as C.

Other object-oriented languages came on the scene roughly at the same time or shortly after C++ was released. These were Smalltalk, Objective-C and Java. They completely eliminated the need for the programmer to worry about memory management and they also removed direct use of pointers. In addition, they were strictly object-oriented (everything became an object) and the notion of stand alone functions and functional programming was minimized or removed.

I personally switched from C and C++ to Java in the mid- to late 90’s and productively used that language for over 15 years. Before Python became firmly established as a language of choice, Java was likely the most popular language of its day. Java is incredibly versatile, while also rigorous, and lends itself to large stand-alone applications. I have built numerous simulation models that were used in my own research but could also easily be shared with my customers. The saying “Write Once, Run anywhere” rings true for Java in my own experience.

To complete the discussion of Java I show the code snippet that implements the spline functions, or the “SplineGenerator” class as it were in case of Java.

This code illustrates many of the points of object-oriented programming I made earlier. First, we see that the class contains all the vectors it needs and it protects them (keyword private) from being accessed from the outside other than through specific getter methods (e.g. public double[] getUX()). Memory for these vectors is allocated by the “new double[n]” statement, which hides the cumbersome pointer code used in the C example. Furthermore, there is no need to explicitly deallocate this memory, it’s done for you behind the scenes by the so-called garbage collector. Without pointers in the program the syntax looks more like FORTRAN than C. But it is much more expressive than FORTRAN. Notice for example how elegantly we get around the GO TO’s by using a switch statement in Java. All three cases of n = 1, 2 or >=3 are easily handled in one place without a need to jump around in the code.

A final word around code readability. You notice that the semicolons and the squiggly brackets are still in the Java code. From that standpoint formatting is optional but a good code editor helps keep things formatted and in order. I don’t know for sure but I could suspect that at the time when Java was invented there was still a need to make the code clear to the compiler rather than making the code easy to read for humans. But Java code is easier to read than C code, that’s for sure.

public class SplineGenerator {
    private double[] b;
    private double[] c;
    private double[] d;
    private double[] ux;
    private double[] uxx;

    public void spline(double[] x, double[] y) {
        int n = x.length;
        if (n != y.length) {
            System.out.println("x and y are not the same length in spline!!!");
            return;
        }
        b = new double[n];
        c = new double[n];
        d = new double[n];
        switch (n) {
            case 1:
                System.out.println("Arrays must have more than one data points in spline!!!");
                break;
            case 2:
                double b0 = (y[1] - y[0]) / (x[1] - x[0]);
                b[0] = b0;
                b[1] = b0;
                break;
            default:
                int nm1 = n - 1;
                d[0] = x[1] - x[0];
                c[1] = (y[1] - y[0]) / d[0];
                for (int i = 1; i < nm1; i++) {
                    d[i] = x[i + 1] - x[i];
                    b[i] = 2 * (d[i - 1] + d[i]);
                    c[i + 1] = (y[i + 1] - y[i]) / d[i];
                    c[i] = c[i + 1] - c[i];
                }
                b[0] = -d[0];
                b[nm1] = -d[nm1 - 1];
                c[0] = 0;
                c[nm1] = 0;
                if (n > 3) {
                    c[0] = c[2] / (x[3] - x[1]) - c[1] / (x[2] - x[0]);
                    c[nm1] = c[nm1 - 1] / (x[nm1] - x[nm1 - 2]) - c[nm1 - 2] / (x[nm1 - 1] - x[nm1 - 3]);
                    c[0] = c[0] * d[0] * d[0] / (x[3] - x[0]);
                    c[nm1] = -c[nm1] * d[nm1 - 1] * d[nm1 - 1] / (x[nm1] - x[nm1 - 3]);
                }
                //forward elimination
                for (int i = 1; i < n; i++) {
                    double t = d[i - 1] / b[i - 1];
                    b[i] -= t * d[i - 1];
                    c[i] -= t * c[i - 1];
                }
                //back substitution
                c[nm1] /= b[nm1];
                for (int ib = 0; ib < nm1; ib++) {
                    int i = n - 2 - ib;
                    c[i] = (c[i] - d[i] * c[i + 1]) / b[i];
                }
                //compute polynomial coefficients
                b[nm1] = (y[nm1] - y[nm1 - 1]) / d[nm1 - 1] + d[nm1 - 1] * (c[nm1 - 1] + 2 * c[nm1]);
                for (int i = 0; i < nm1; i++) {
                    b[i] = (y[i + 1] - y[i]) / d[i] - d[i] * (c[i + 1] + 2 * c[i]);
                    d[i] = (c[i + 1] - c[i]) / d[i];
                    c[i] = 3 * c[i];
                }
                c[nm1] = 3 * c[nm1];
                d[nm1] = d[nm1 - 1];
            
        }
    }

    public double evaluateSplineAt(double u, double[] x, double[] y) {
        int i = 0;
        int j = x.length;
        do {
            int k = (i + j) / 2;
            if (u < x[k]) {
                j = k;
            }
            if (u >= x[k]) {
                i = k;
            }
        } while (j > i + 1);
        double dx = u - x[i];
        return y[i] + dx * (b[i] + dx * (c[i] + dx * d[i]));
    }

    public void derivativesAtGridpoints(double xl, double xu, int n, double[] u, double percent) {
        //compute unequal grid spacing with percent increase
        double[] x = new double[n];
        ux = new double[n];
        uxx = new double[n];
        double sum = 0.0;
        for (int i = 0; i < (n - 1); i++) {
            sum += Math.pow((1.0 + percent / 100), i);
        }
        double dx = (xu - xl) / sum;
        for (int i = 0; i < n; i++) {
            if (i == 0) {
                x[i] = xl;
            } else {
                x[i] = x[i - 1] + dx * Math.pow((1.0 + percent / 100), (i - 1));
            }
        }

        spline(x, u);
        for (int i = 0; i < n; i++) {
            ux[i] = b[i];
            uxx[i] = 2.0 * c[i];
        }

    }

    public double[] getUX() {
        return ux;
    }

    public double[] getUXX() {
        return uxx;
    }

}

Swift

When I started SySim Consulting in 2014 I transitioned from Java to Objective-C and later to Swift. The reason was partly that I wanted to try something new and partly that I became interested in exploring the iPad as a tool for interactive simulations.

I found Objective-C to be unintuitive and quite difficult to learn and use. I must not have been alone since with Apple’s new language, Swift, they took a whole new approach to language syntax, much more like C++ and Java.

Swift is a very modern language drawing from the experiences of programmers who had struggled with the limitations and quirks found in older paradigms. It took me a couple of years of using the language both for Mac OS and iOS applications before I got completely comfortable with it. The learning curve for me was extra steep because the language kept evolving as I was learning. New features were introduced with frequent updates making it hard for me to keep up.

There are too many novel features in Swift to cover here but I will mention three concepts that were new to me and I found very powerful: (1) Protocol extensions, (2) Optionals, and (3) Tuples. The first one has to do with objects and is not illustrated in the code snippet below. But the idea of Optionals and Tuples are.

The use of Optionals is shown in the return type of the spline function as -> coefficientVectors? The question mark after the struct expresses the notion that the spline function optionally may not return anything. In fact, the code shows that if the x and y input vectors are of different lengths we cannot proceed and return with nothing (nil). Also if n = 1 we must exit without the struct and also return nil.

How do we then deal with the spline function when we call it? Built into the Swift language are a couple of different ways to recognize an Optional. If you look towards the end of the code snippet you find a line that says: “if let coefVectors = spline(xArray: x, yArray: u)“. In words this says that if the spline function returns a struct then assign it to the variable coefVectors, otherwise skip the code that follows the if. That way we are assured not to crash from pointing at empty space.

A Tuple is a collection of variables, not necessarily of the same type as in an array. There are often times when you like to return more than one value from a function or a class method. FORTRAN, C or Java do not permit this. In C you have to go through the function’s argument list and pass pointers to the variables you want to consume or produce. In Java you need to form a new object that contains the variables and return this object or provide getter functions to the variables of interest. The use of Tuples in Swift is far more elegant and transparent. Both the second and third functions below return Tuples. No new objects required, just put what you want to return in parentheses and return it!

I find Swift to be the most elegant programming language I’ve used to date. The strongly typed syntax, the many modern constructs and the fast execution speed makes it ideal for building major applications. I’ve do so for several different processes and implemented the code both on Mac’s (MacOS) and iPads (iOS). It works. And I have to mentioned the readability of the code. Notice that the semicolons are gone. Gone are also parentheses around for loops and if-statements. The squiggly brackets are still there but you’ll see in the Python code even those are gone. In short, a modern language emphasizes human readability.

Well, nothing is perfect, at least not yet. While Swift is now open source https://www.swift.org it is still very much tied to Apple devices and their many support libraries. And I discovered in talks and presentations I’ve given that the engineering community is more Windows based than MacOS oriented. So unlike with Java, where I could easily share my models, the Swift models are still confined to my Mac’s and iPads. Not ideal.

import Foundation

public struct coefficientVectors {
    var b: [Double]
    var c: [Double]
    var d: [Double]
}

public func spline(xArray x: [Double], yArray y: [Double]) -> coefficientVectors? {
    let n = x.count
    if n != y.count {
        return nil
    }
    switch n {
    case 1:
        return nil
    case 2:
        let b0 = (y[1] - y[0]) / (x[1] - x[0])
        return coefficientVectors(b: [b0, b0], c: [0.0, 0.0], d: [0.0, 0.0])
    default:
        var b = Array(repeating: 0.0, count: n)
        var c = b
        var d = b
        let nm1 = n - 1
        d[0] = x[1] - x[0]
        c[1] = (y[1] - y[0]) / d[0]
        for i in 1..<nm1 {
            d[i] = x[i+1] - x[i]
            b[i] = 2 * (d[i-1] + d[i])
            c[i+1] = (y[i+1] - y[i]) / d[i]
            c[i] = c[i+1] - c[i]
        }
        b[0] = -d[0]
        b[nm1] = -d[nm1-1]
        c[0] = 0
        c[nm1] = 0
        if n > 3 {
            c[0] = c[2] / (x[3] - x[1]) - c[1] / (x[2] - x[0])
            c[nm1] = c[nm1-1] / (x[nm1] - x[nm1-2]) - c[nm1-2] / (x[nm1-1] - x[nm1-3])
            c[0] = c[0] * d[0] * d[0] / (x[3] - x[0])
            c[nm1] = -c[nm1] * d[nm1-1] * d[nm1-1] / (x[nm1] - x[nm1-3])
        }
        //forward elimination
        for i in 1..<n {
            let t = d[i-1] / b[i-1]
            b[i] -= t * d[i-1]
            c[i] -= t * c[i-1]
        }
        //back substitution
        c[nm1] /= b[nm1]
        for ib in 0..<nm1 {
            let i = n - 2 - ib
            c[i] = (c[i] - d[i] * c[i+1]) / b[i]
        }
        //compute polynomial coefficients
        b[nm1] = (y[nm1] - y[nm1-1]) / d[nm1-1] + d[nm1-1] * (c[nm1-1] + 2 * c[nm1])
        for i in 0..<nm1 {
            b[i] = (y[i+1] - y[i]) / d[i] - d[i] * (c[i+1] + 2 * c[i])
            d[i] = (c[i+1] - c[i]) / d[i]
            c[i] = 3 * c[i]
        }
        c[nm1] = 3 * c[nm1]
        d[nm1] = d[nm1-1]
        return coefficientVectors(b: b, c: c, d: d)
    }
}

public func evaluateSpline(at u: Double, xArray x: [Double], yArray y: [Double], coefficientVectors cv:coefficientVectors) -> (s: Double, sx: Double, sxx: Double) {
    var i = 0
    var j = x.count
    repeat {
        let k = (i + j) / 2
        if u < x[k] { j = k }
        if u >= x[k] { i = k }
    } while j > i + 1
    let dx = u - x[i]
    let s = y[i] + dx * (cv.b[i] + dx * (cv.c[i] + dx * cv.d[i]))
    let sx = cv.b[i] + dx * (2 * cv.c[i] + dx * 3 * cv.d[i])
    let sxx = 2 * cv.c[i] + dx * 6 * cv.d[i]
    return (s, sx, sxx)
}

public func derivativesAtGridpoints(lowerXBoundary xL: Double, upperXBoundary xU: Double, gridPoints n: Int, valuesAtGridPoints u: [Double], percentIncrease percent: Double = 0) -> (ux: [Double], uxx: [Double]) {
    var ux = u
    var uxx = u
    var x = u
    //compute unequal grid spacing with percent increase
    var sum = 0.0
    for i in 0..<(n-1) {
        sum += pow((1.0 + percent / 100.0), Double(i))
    }
    let dx = (xU - xL) / sum
    for i in 0..<x.count {
        if i == 0 {
            x[i] = xL
        } else {
            x[i] = x[i-1] + dx * pow((1.0 + percent / 100.0), Double(i-1))
        }
    }
    if let coefVectors = spline(xArray: x, yArray: u) {
        ux = coefVectors.b
        for i in 0..<n {
            uxx[i] = 2.0 * coefVectors.c[i]
        }
    }
    return (ux, uxx)
}

Python

Prior to giving it a serious look I had heard a lot about Python and its use in developing websites, task automation, data analysis, data visualization and machine learning but was not sure it was suitable for dynamic modeling and interactive simulations. I was skeptical of its performance since I knew it was a scripting language and not directly compiled into machine code. But if you have read some of my other posts you know that I now have embraced Python completely. In my blog post comparing Python and Swift you find many of the reasons why I like Python. Here I will merely add a few observations around the code itself specifically related to what I said around some of previously mentioned languages.

If you look at the Python code below for implementing the cubic splines we have practically come full circle around to FORTRAN clarity! Just like in the FORTRAN code there are some useful comments about how use of the code. However, the Python comments are much more than a service to the programmer, they also help the user. For example, when I have the environment open where the spline function lives and I type help(spline), I get the output shown right below. It gives me all the information for using the function without having to look at the code.

Help on function spline in module symods.integrators.utils.spline:
spline(x, y)
    Calculate the cubic spline for a set of x- and y-values
    
    Parameters
    ----------
    x : np.array of x-values
        
    y : np.array of y-values
        
    
    Returns
    -------
    tuple of np.arrays of polynomial coefficients b, c, d

The next feature of code clarity is the avoidance of semicolons, squiggly brackets, and redundant parentheses. Instead, Python relies on indentation to tell the interpreter where one block ends and another starts. In addition to being a language requirement, the indentations help structure the code and make it very readable.

But as I have said before, nothing is perfect. I miss the Optionals and Switch statements from Swift along with Interfaces and Protocols from Java and Swift. Python has Tuples though and they are great. Python is slower than both Java and Swift but shares the advantage with Java that it can run pretty much anywhere. And that is important for the work I do.

import numpy as np


def spline(x, y):
    """Calculate the cubic spline for a set of x- and y-values

    Parameters
    ----------
    x : np.array of x-values
        
    y : np.array of y-values
        

    Returns
    -------
    tuple of np.arrays of polynomial coefficients b, c, d
    """

    n = len(x)
    if n == 1:
        print('Dimension must be greater than 1')
        return [0], [0], [0]
    if n == 2:
        b0 = (y[1] - y[0]) / (x[1] - x[0])
        return [b0, b0], [0.0, 0.0], [0.0, 0.0]
    b = np.zeros(n)
    c = np.zeros(n)
    d = np.zeros(n)
    nm1 = n - 1
    d[0] = x[1] - x[0]
    c[1] = (y[1] - y[0]) / d[0]
    for i in range(1, nm1):
        d[i] = x[i+1] - x[i]
        b[i] = 2 * (d[i-1] + d[i])
        c[i+1] = (y[i+1] - y[i]) / d[i]
        c[i] = c[i+1] - c[i]
    b[0] = -d[0]
    b[nm1] = -d[nm1-1]
    c[0] = 0
    c[nm1] = 0
    if n > 3:
        c[0] = c[2] / (x[3] - x[1]) - c[1] / (x[2] - x[0])
        c[nm1] = c[nm1-1] / (x[nm1] - x[nm1-2]) - c[nm1-2] / (x[nm1-1] - x[nm1-3])
        c[0] = c[0] * d[0] * d[0] / (x[3] - x[0])
        c[nm1] = -c[nm1] * d[nm1-1] * d[nm1-1] / (x[nm1] - x[nm1-3])
    # forward elimination
    for i in range(1, n):
        t = d[i-1] / b[i-1]
        b[i] -= t * d[i-1]
        c[i] -= t * c[i-1]
    # back substitution
    c[nm1] /= b[nm1]
    for ib in range(0, nm1):
        i = n - 2 - ib
        c[i] = (c[i] - d[i] * c[i+1]) / b[i]
    # compute polynomial coefficients
    b[nm1] = (y[nm1] - y[nm1-1]) / d[nm1-1] + d[nm1-1] * (c[nm1-1] + 2 * c[nm1])
    for i in range(0, nm1):
        b[i] = (y[i+1] - y[i]) / d[i] - d[i] * (c[i+1] + 2 * c[i])
        d[i] = (c[i+1] - c[i]) / d[i]
        c[i] = 3 * c[i]
    c[nm1] = 3 * c[nm1]
    d[nm1] = d[nm1-1]
    return b, c, d


def evaluate_spline_at(u, x, y, cv):
    """Evaluate cubic spline at an arbitrary input point u.

    Parameters
    ----------
    u : float
        
    x : np.array of x-values
        
    y : np.array of y-values
        
    cv : tuple of polynomial coefficient arrays, (b, c, d) received from a call to spline.
        

    Returns
    -------
    tuple of three floats, (s, sx, sxx)
    where s = the y-value at u
          sx = the first derivative at u
          sxx = the second derivative at u
    """
    i = 0
    j = len(x)
    b, c, d = cv
    while j > i + 1:
        k = (i + j) // 2
        if u < x[k]:
            j = k
        if u >= x[k]:
            i = k
    dx = u - x[i]
    s = y[i] + dx * (b[i] + dx * (c[i] + dx * d[i]))
    sx = b[i] + dx * (2 * c[i] + dx * 3 * d[i])
    sxx = 2 * c[i] + dx * 6 * d[i]
    return s, sx, sxx


def derivatives_at_gridpoints(x_lower, x_upper, n, y, percent=0.0):
    """Calculate the first and second derivatives at the n gridpoints that may be unequally spaced

    Parameters
    ----------
    x_lower : float
        lower bound of the x-range
        
    x_upper : float
        upper bound of the x-range
        
    n : int
        number of gridpoints
        
    y : np.array of y-values at the gridpoints
        
    percent : float
         (Default value = 0.0)
         The spacing of the n gridpoints will increase by percent (%) amount for each subsequent gridpoint

    Returns
    -------
    tuple of two np.arrays (ux, uxx),
    containing the first and second derivative vectors at the gridpoints
    """
    # compute unequal grid spacing with percent increase
    x = np.zeros(n)
    uxx = np.zeros(n)
    a_sum = 0.0
    for i in range(0, n-1):
        a_sum += pow((1.0 + percent / 100.0), i)
    dx = (x_upper - x_lower) / a_sum
    for i in range(0, len(x)):
        if i == 0:
            x[i] = x_lower
        else:
            x[i] = x[i-1] + dx * pow((1.0 + percent / 100.0), i)
    b, c, d = spline(x, y)
    ux = b
    for i in range(0, n):
        uxx[i] = 2.0 * c[i]
    return ux, uxx

Kotlin

By now I’ve been working with Python for well over a year and found it to be a great tool. It shines when it comes to data analysis, visualization and machine learning. However, due to its interpreted nature it is a bit slow for substantial dynamic simulations.

So, I started to look back at Java to see how that language had progressed since I left it in 2014. In my search I came across a really good blog post https://www.marcobehler.com/guides/a-guide-to-java-versions-and-features that made me realize that the Java I knew well from years ago is many versions behind the current one. Today’s Java has a Swift-like Switch block, a form of Optionals, improved Interfaces, etc. But the basic structure of the language is still Java. I was looking for something beyond.

Then I found Kotlin: https://kotlinlang.org. On its home page it is advertised as “a modern programming language that makes developers happier”. That was enough for me to take a closer look.

I quickly realized that this language has some real potential for me. First, it is multi-platform since it compiles into Byte code that runs on Java’s virtual machine (JVM). Second, it is fast since it is essentially like Java when executed by the JVM. Third, and perhaps best of all, it looks like Swift! https://www.raywenderlich.com/6754-a-comparison-of-swift-and-kotlin-languages.

Below I have translated the spline code to Kotlin. If you compare it to the Swift version you will find that they are nearly identical with a few minor differences and only one major: Kotlin does not have Tuples. Instead, like Java, you have to create a data class to hold the variables you want to return to the caller. It is not as elegant as a Tuple but not a show stopper either.

At this time I don’t have more than a few weeks experience with Kotlin but they have been productive. By using Jetbrain’s IntelliJ IDEA https://www.jetbrains.com/help/idea/get-started-with-kotlin.html I have been able to quickly translate Java code to Kotlin. Furthermore, I’ve discovered that if I paste in Swift code into the editor I have a very good base for manually turning it into Kotlin. In future posts I will share my use of Kotlin and also make some comparisons with Python.

data class TupleOfDoubleArrays(var b: DoubleArray, var c: DoubleArray, var d: DoubleArray)

public fun spline(x: DoubleArray, y: DoubleArray): TupleOfDoubleArrays? {
    val n = x.size
    if (n != y.size) {
        return null
    }
    val b = DoubleArray(n)
    val c = DoubleArray(n)
    val d = DoubleArray(n)

    when (n) {
        1 -> {
            return null
        }
        2 -> {
            val b0 = (y[1] - y[0]) / (x[1] - x[0])
            b[0] = b0
            b[1] = b0
            return TupleOfDoubleArrays(b, c, d)
        }
        else -> {
            val nm1 = n - 1
            d[0] = x[1] - x[0]
            c[1] = (y[1] - y[0]) / d[0]
            for (i in 1 until nm1) {
                d[i] = x[i+1] - x[i]
                b[i] = 2 * (d[i-1] + d[i])
                c[i+1] = (y[i+1] - y[i]) / d[i]
                c[i] = c[i+1] - c[i]
            }
            b[0] = -d[0]
            b[nm1] = -d[nm1-1]
            c[0] = 0.0
            c[nm1] = 0.0
            if (n > 3) {
                c[0] = c[2] / (x[3] - x[1]) - c[1] / (x[2] - x[0])
                c[nm1] = c[nm1-1] / (x[nm1] - x[nm1-2]) - c[nm1-2] / (x[nm1-1] - x[nm1-3])
                c[0] = c[0] * d[0] * d[0] / (x[3] - x[0])
                c[nm1] = -c[nm1] * d[nm1-1] * d[nm1-1] / (x[nm1] - x[nm1-3])
            }
            //forward elimination
            for (i in 1 until n) {
                val t = d[i-1] / b[i-1]
                b[i] -= t * d[i-1]
                c[i] -= t * c[i-1]
            }
            //back substitution
            c[nm1] /= b[nm1]
            for (ib in 0 until nm1) {
                val i = n - 2 - ib
                c[i] = (c[i] - d[i] * c[i+1]) / b[i]
            }
            //compute polynomial coefficients
            b[nm1] = (y[nm1] - y[nm1-1]) / d[nm1-1] + d[nm1-1] * (c[nm1-1] + 2 * c[nm1])
            for (i in 0 until nm1) {
                b[i] = (y[i+1] - y[i]) / d[i] - d[i] * (c[i+1] + 2 * c[i])
                d[i] = (c[i+1] - c[i]) / d[i]
                c[i] = 3 * c[i]
            }
            c[nm1] = 3 * c[nm1]
            d[nm1] = d[nm1-1]
            return TupleOfDoubleArrays(b, c, d)
        }
    }
}

data class TupleOfSplineResults(var s: Double, var sx: Double, var sxx: Double)

public fun evaluateSplineAt(u: Double, x: DoubleArray, y: DoubleArray, cv:TupleOfDoubleArrays): TupleOfSplineResults {
    var i = 0
    var j = x.size
    do {
        val k = (i + j) / 2
        if (u < x[k]) { j = k }
        if (u >= x[k]) { i = k }
    } while (j > i + 1)
    val dx = u - x[i]
    val s = y[i] + dx * (cv.b[i] + dx * (cv.c[i] + dx * cv.d[i]))
    val sx = cv.b[i] + dx * (2 * cv.c[i] + dx * 3 * cv.d[i])
    val sxx = 2 * cv.c[i] + dx * 6 * cv.d[i]
    return TupleOfSplineResults(s, sx, sxx)
}

public fun derivativesAtGridpoints(xL: Double, xU: Double, n: Int, u: DoubleArray, percent: Double = 0.0): TupleOfDoubleArrays {
    val uxx = u.copyOf()
    val x = u.copyOf()
    //compute unequal grid spacing with percent increase
    var sum = 0.0
    for (i in 0 until n-1) {
        sum += Math.pow((1.0 + percent / 100.0), i.toDouble())
    }
    val dx = (xU - xL) / sum
    for (i in x.indices) {
        if (i == 0) {
            x[i] = xL
        } else {
            x[i] = x[i-1] + dx * Math.pow((1.0 + percent / 100.0), (i-1).toDouble())
        }
    }
    val coefTuple = spline(x, u) ?: throw IllegalArgumentException("Spline Function Returning Null")
    val ux = coefTuple.b
    for (i in 0 until n) {
        uxx[i] = 2.0 * coefTuple.c[i]
    }

    return TupleOfDoubleArrays(ux, uxx, DoubleArray(n))
}